Sidebar
Table of Contents
Part 2
Entries
Entry 1: October 10th, 2012
Today, we ventured further into the mystical land of bash scripting. Today, we began to work with scripts that accepted arguments. We wrote a script which on it's first run asked us to input our name. On any following execution, if ran without an arguments, the script would return “Welcome back, $name”. If it was ran with an argument, however, it would return the string “Intruder!”
Entry 2: October 19th, 2012
Today we began by talking more about the “ps” and “kill” commands. We went through the list of processes being run, from the start (the processes being run by root when the system booted up). Next we used the “top” command, which is an interactive ps command that shows the top running processes on the system.
Next we talked about the three layers of computing processes. There is the kernel, the modules/drivers, and userspace. The first process running in the userspace is init, and all other processes are a child of that.
The next command we talked about was “whowatch”. This command shows a list of users, and then we can see a tree of their processes.
The next big great new command we talked about was the “sed” command. sed is a stream editor command. We used the sed command to search for any instance of multiple spaces in our ps command, and replace it with only one space. After this, we could use the cut command with spaces as a delimiting character to print only two columns.
Entry 3: October 24th, 2012
Today, we began talking about regular expressions. Regular expressions let us search within a file.
A list of common basic regular expressions is:
$ - match end of line \< - match beginning of word \> - match end of word . - match any single character * - 0 or more of the previous [] - character class - match any of the enclosed [^] - inverted character class - do not match any of enclosed
Extended regular expressions:
( ) - grouping - \( \)
+ - match 1 or more of the previous
Next, we used the regular expressions, along with the grep command, to work with a file that had a list of words. First, we looked for any word that contained “and”. We did this by using “cat words | grep 'and' | wc -l”. Next, we looked for all words that started with “or”, by using “cat words | grep '^or' | wc -l”. The next string we searched for was words starting with either “or” or “Or”. The grep command for this was “grep ^[Oo]r”. And then we went deeper! Starts with “or” or “Or”, and ends with e. “grep ^[Oo]r.*e$”. Up next! Does not start with a lowercase vowel, has a 'g' somewhere, and ends with a 's' or 'e'. “grep ^[^aeiouy].*g.*[se]$”.
Next, we delved into using extended regex's. We used egrep to search for any word ending with “ing” or “ed”. “egrep ing$|ed$”.
Entry 4: October 26th, 2012
Today, we decided to engage in some rudimentary data mining! Sort of. Kind of. Not quite. But it sounds cool. We copied a gzipped file which was the course list for the Spring 2013 semester. While gzipped, the file was only 67 kilobytes. Decompressed however, it ended up being 2.1 megabytes. Next, we opened the file. Since the file is an .html code, there is a lot of code breaking up the actual content of the file. Therefore, we need to get rid of that pesky code to make it easily readable! We noticed that lines with the class name started with “<TH CLASS=“ddtitle””, so we grepped for that.
In order to get rid of some of the extra junk we didn't need, we next used sed. The sed command we used was “sed 's/^.*crn_in=…..”>g'“. After doing this, there were still a few html closing tags at the end of the line, so we got rid of those with the sed command “sed 's/<\/A><\/TH>$g'”. This gave us a plain list of all the courses and their course numbers.
Next, we learned how we could use sed to change the organization of the file. The classes were listed in the format “Title - CRN - Course - Section”. Using a ridiculously long sed command, we changed the format to “Course - Section:CRN:Title”.
Keywords
unix Keyword 2
pipes
Definition
In Unix, a pipe (or pipeline) is used to direct the flow of output from one command as input to another command. This can be used to connect two operations together on a single command line, instead of having to use multiple command line inputs to receive the same result.
In Unix systems, pipes are shown using a vertical bar symbol, |. This bar will take the output from the command on the left, and use it as the input for the command on the right.
An example of this would be:
who | grep $USERThis would execute the who command, and then use it as input to the grep command, which would parse who for all instances of your own username.
References
unix Keyword 2 Phase 2
escape character
Definition
An escape character is a character used to invoke an alternative interpretation of subsequent characters in a sequence. This is generally used when a character on it's own has a specific function.
An example of this (in bash) would be the * wildcard, which is used to expand a name. If a * is needed as a literal character (“*” as opposed to *), an escape character is needed to tell the * not to act as a wildcard. In bash, the escape character is a backslash. Typing \* would treat * as a character, instead of a wildcard.
References
Demonstration
For my demonstration, I'm going to create a few files using symbols which require escape characters, and then show how the escape characters must be used to access these files.
The files I created were named “$$$”, “***”, “???”, and “\\\”
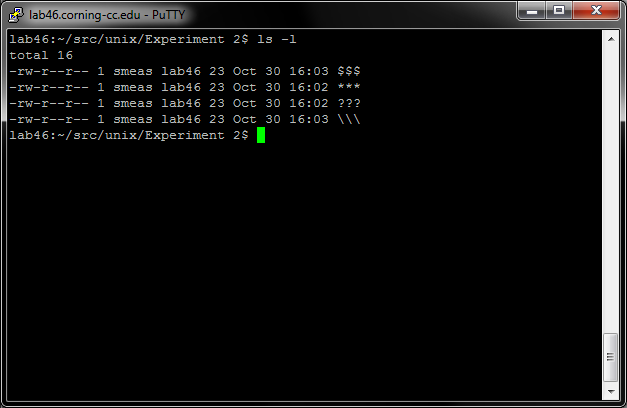
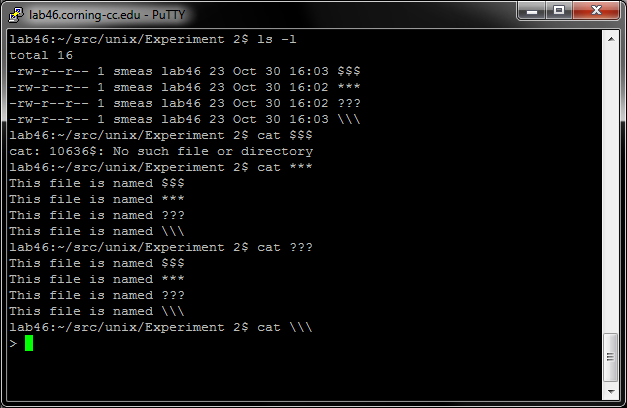
Attempting to access these files by typing in just their names caused different things to happen for each file, based on what the purpose of that file's character was.
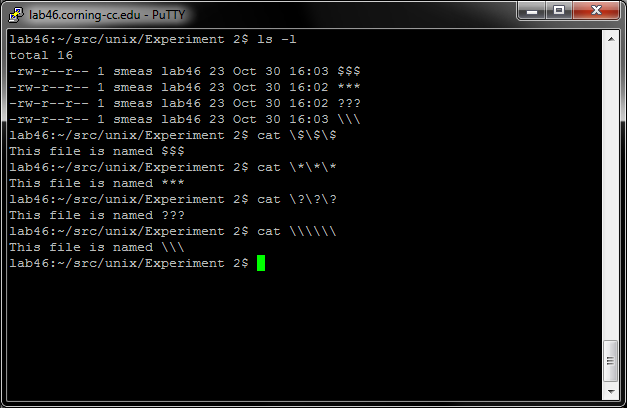
However, if the bash escape character (“\”) was used before each character in the files' names, they were treated as a regular character, instead of a special character.
(I also realized right after taking and uploading these screenshots, I made my demonstration in my Experiment 2 folder on accident. Whoopsie!)
Experiment 2
Question
Is it possible to access a computer running Linux from a computer running Windows, with complete access to the desktop environment and not just a terminal.
Resources
According to this blog, it is possible to do. In order to do it, you must install a VNC client on Windows. According to this blog, the VNC client of choice is TightVNC.
Hypothesis
From what I've read, this seems entirely possible. There seems to be plenty of resources out there that discuss how to do it. According to these, it's much easier to access a Windows PC from a Linux machine, since Linux has VNC built into it. But it's completely possible to access a Linux machine from a Windows machine through a third party VNC client.
Experiment
I'm going to test my experiment by installing the TightVNC program on my desktop running Windows, and attempting to access my laptop running Linux (Mint distro).
Data
As I said, the first step of my experiment was downloading and installing TightVNC on my desktop Windows machine. After the 1,952 kb file downloaded, a at speedy 3.2 kb/s, I installed it.
Next, I installed the tightvncserver program on my Linux machine. After it installed, I ran the program by typing “tightvncserver” into the terminal, and started the server.
When this was done, I used the ifconfig command to get the LAN IP address of my laptop (10.0.0.7) and entered that into the TightVNCViewer on my Windos machine, followed by the default port number (5901).
I was then prompted to input the password for my Linux machine.
When this was done, it connected to my Linux machine… kind of. It showed a few icons, but there was no taskbar or titles for the icons. Upon opening my home folder, it appeared as if it was running a different desktop environment, instead of cloning the output of my laptop.
I decided to search for another VNC viewer client for Windows, since I suspected that was the problem. The next one I came across was UltraVNC. I downloaded and installed this viewer, and decided to give it a shot.
After installing it, I ran the viewer, and again typed in the IP address of my Linux machine.
This one connected quickly, and worked flawlessly the first time. The exact display of my Linux machine was duplicated into a window on my Windows machine. Success!
I've uploaded the screencaps I took for the experiment to an imgur album. I felt it was a lot easier to organize them this way, and made my opus less cluttered. The images are numbered in order, and contain a short description.
Here is the link to the first image in the album.
Analysis
My hypothesis was completely correct. It is possible to access a Linux machine's desktop (not a terminal, through SSH such as with Lab 46) from a Windows machine, through the use of VNC.
There is more going on than I originally thought, as two different VNC viewers for Windows obviously had very different results. While they both connected, one of them had a very undesirable display, whereas the other worked flawlessly. The one downside however seemed to be bandwidth. Both my machines are running over crappy wireless connections, through an even crappier wireless router. I'm sure if they were hardwired, there would be no latency issues whatsoever.
As far as shortcomings in my experiment, I did see other VNC viewers for Windows out there. However, the second one I tried seemd to work beautiful, so I feel there was no need to test any others.
Conclusions
Based on the experiment I performed, I learned that it's possible to access a machine remotely cross-operating system. This is quite handy, as I prefer to run Windows on my desktop, for the games and whatnot. I could easily dual-boot a Linux distro, or possibly even run one in a VM. While they would both probably perform much better, I feel that the small performance hit would be worth it in that I could access the files stored on my Linux laptop from my Windows desktop.
This could come in quite useful, as I generally use my laptop for all my schoolwork. Using VNC, I could work on files on my laptop, while using my comfortable keyboard and mouse, and my monstrous 27” monitor. Far superior to a laptop keyboard and teeny tiny baby screen!
I'll just have to remember to plug in next time. Because WiFi makes high bandwidth transfers sad :(
