Sidebar
Table of Contents
Shawn Meas's Fall 2012 Opus
Unix/Linux Fundamentals
Introduction
My name is Shawn Meas. Long story short, I'm awesome. I have two goals in life. The first, is to invent a cheese and name it after myself (Meas Cheese, © Shawn Meas). I will then start a company named MeasCorp, and take over the world. My second (and more realistic) goal is to continue on with programming, in hopes of getting into the game development industry, whether as an indie dev or working for a larger dev studio.
Part 1
Entries
Entry 1: August 31st, 2012
Today, we talked about revision control, and the variations it has gone through since its induction. We then proceeded to set up our own repositories on Lab 46's servers, using Mercurial. I have previously used Mercurial in Structure and Object Oriented Problem Solving with Joe, and I also use it in his C/C++ course. In his course, however, we use Bitbucket as a hosting service. I already feel proficient in using Mercurial on Linux systems, but using it on a dedicated server is new to me.
Entry 2: September 7th, 2012
Today in class, we finished exploring the UNIX/Linux file system, and moved on into using the VI text editor. I've been using VI personally for about a month now, but I was still amazed at some of the new commands I started to learn. I had thought I was quite proficient in it, but a few of the new commands made me realize that I'm still just a starter to VI. Likewise, I had felt very productive in it before, but with some of the new commands I know that my productivity with it will increase even more. Specifically, using 'o' or 'O' to start inserting on a new line before or after a line, as well as using 'd' to select a line and 'd' a second time to delete that line. I look forward to learning even more tips and tricks to increase my productivity in VI.
Entry 3: September 14th, 2012
Today in class, we started going over data streams and redirecting input and output.
A few of the main things we touched on were:
cat <filename>: Displays the content of a text file in the terminal echo: Returns a string to the terminal $: Indicates that what follows is a variable here strings: Inputs a variable into a command pipes (|): Allows you to use the output of one command as the input to another
We combined a few of these things into the command:
/usr/bin/who | grep $USER
This command returned to us our login sessions for Lab46
Entry 4: September 28th, 2012
Today we began by talking a little bit more about scripting. I feel a little more comfortable about scripting now, after having worked with it a little for my first experiment. The first thing we talked about was that the shabang can point to different directories than /bin/bash. One of the main reasons for this would be if the script was written with a different language, such as perl, Python, or LUA. We then wrote a very basic script, which echoed a string, asked for an input, then echoed another string which contained the input.
Next, we wrote a second bash script. This script first picked a random value, then prompted the user to guess the value. The two numbers were then evaluated in an if statement which determined whether they were equal or not, and then printed a string telling the result.
Keywords
Unix/Linux Keyword 1
Version Control
Definition
Version control refers to managing the changes in a document, source code, or other collection of information. The changes are usually documented by a revision number, timestamp, and who made the change. Revisions can then be compared with or restored to a previous revision. Version control uses a repository, which stores both the current and previous data of the files being version controlled. Version control repositories can either be local only, client-server, or distributed.
Local only repositories are outdated and obsolete. In a local only system, all users must share the same computer system. In a client-server version control system, users share a single repository. While not as outdated or obsolete as a local only repository, it is still not the optimal choice. A distributed revision control system (DRCS) creates a peer-to-peer network, where each user has their own local repository. Changes are then shared between repositories. One of the biggest upsides to a DRCS is that it does not rely on a central node, and therefore is more durable. Two of the most popular DRCS's are Mercurial and Git.
References
- Reference 1: http://en.wikipedia.org/wiki/Revision_control
Unix Keyword Phase 2
File Compression.
Definition
involves encoding information using fewer bits than the original file. It helps reduce resources usage such as data storage space or transmission capacity. In order to use the data again though you must uncompress the file.
References
List any sites, books, or sources utilized when researching information on this topic. (Remove any filler text).
- Reference 1
- Reference 2
- Reference 3
unix Keyword 1 Phase 2 Phase 2
File Compression
Definition
File compression is the reduction in file size by encoding the file using fewer bits than the original file. This can be done by eliminating redundancies in the file (lossless compression), or by identifying and removing marginally important data (lossy compression).
References
Demonstration
To demonstrate the file compression, I first created a regular ASCII text file. The original filesize was 1.4kb (Containing a glorious rap I wrote about file compression, which was mostly rambling). Then, to demonstrate how compression works, I used the command “gzip -9 compression.txt” to compress the file with the maximum compression. The output of this was a new file titled compression.txt.gz, which now had a size of 729 bytes (approximately 50% compression).
lab46:~/Compression Demonstration$ ls -lh
total 4.0K
-rw-r--r-- 1 smeas lab46 1.4K Sep 28 01:36 compression.txt
lab46:~/Compression Demonstration$ gzip -9 compression.txt
lab46:~/Compression Demonstration$ ls -lh
total 4.0K
-rw-r--r-- 1 smeas lab46 729 Sep 28 01:36 compression.txt.gz
lab46:~/Compression Demonstration$
Experiment 1
Question
Is it possible to create a bash script file on my local machine which will automatically connect to Lab46 over SSH and log me in?
Resources
http://askubuntu.com/questions/61963/can-i-create-an-ssh-login-script
According to this question asked on askubuntu.com, it is possible to not only create an SSH login script, but it's possible to set a terminal to automatically connect through SSH when it is opened. While this would be nice, I would much prefer creating a bash script, as I usually always have a terminal open and would find it much easier to type ~/filename.sh
Also, this website handles a passwordless SSH connection. This would not work, because Lab 46 obviously requires a password.
http://unix.stackexchange.com/questions/31071/shell-script-for-logging-into-a-ssh-server
According to this question thread on stackexchange.com, the expect command can be used to do exactly what I'm attempting to do. By creating a script file to first send the SSH command, then wait for a password prompt, and when the prompt is received send the password to the server.
Hypothesis
Based on what I've read in regards to my question, I'm very confident that a bash script file can easily be written to automatically connect to Lab 46. It seems that other people have had success using the expect command in a script to do so.
Experiment
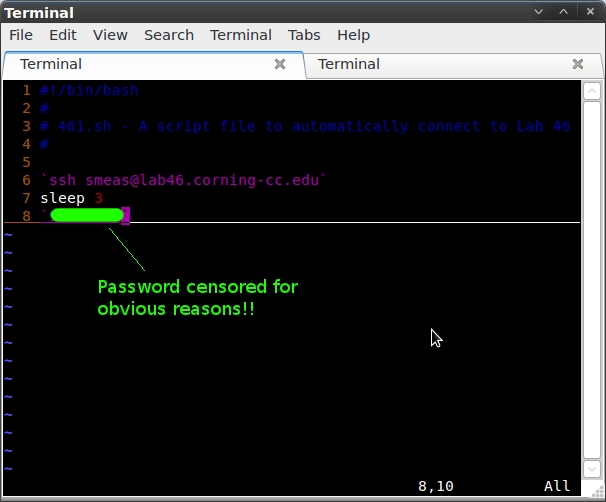
To test my hypothesis, I will create a two .sh bash script files. The first file (461.sh) will be created solely using my preexisting knowledge of scripting, in an attempt to create the script in a way which I feel should logically work. Based on what I know, I feel that I could create a script file with the following code that will work (substituting the variable “mypassword” for my actual password. Ain't nobody stealing my logins!)
#!/bin/bash
#
# 461.sh - A script file to automatically connect to Lab 46
#
`ssh smeas@lab46.corning-cc.edu`
sleep 3
`mypassword`
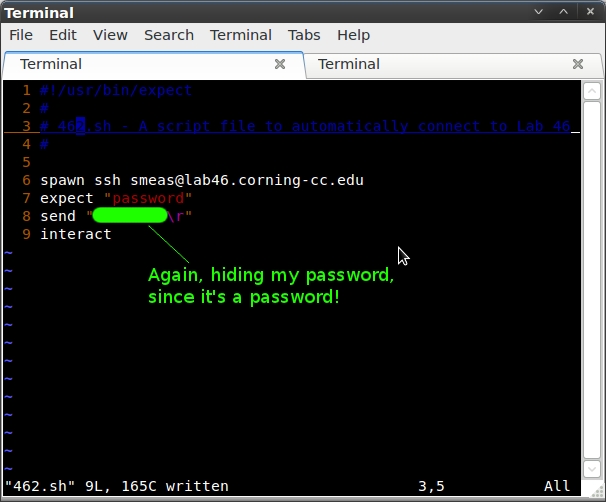
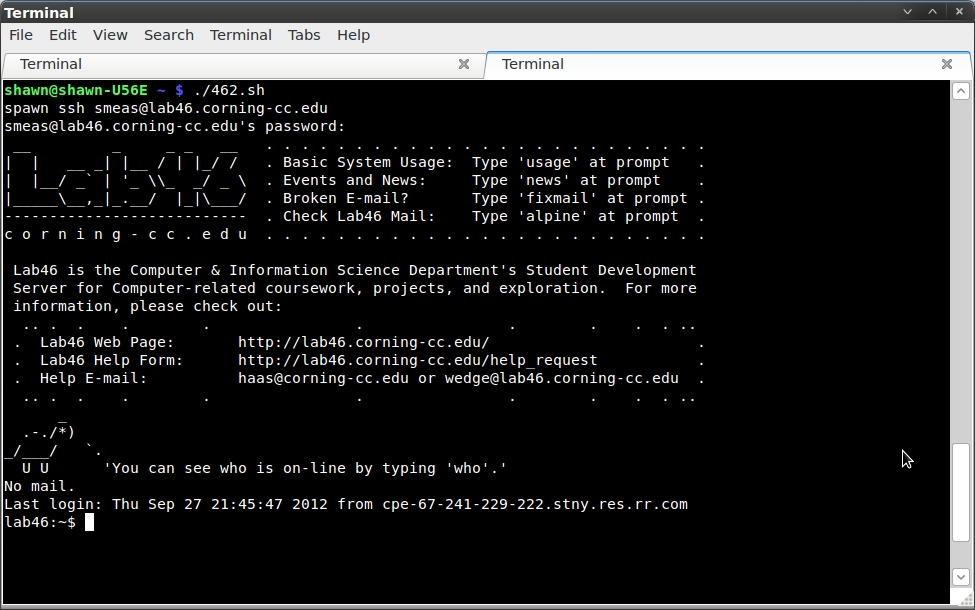
In the second step of my experiment, I will use what I read from the http://unix.stackexchange.com/questions/31071/shell-script-for-logging-into-a-ssh-server question thread. I will first have to use apt-get to download the expect package. Then, basing my script completely off of the first answer in the question thread, I will create a second script file (462.sh). This script file will contain the following (again using “mypassword” instead of my actual password, to protect my sensitive materials!“)
#!/usr/bin/expect
#
# 462.sh - A script file to automatically connect to Lab 46
#

spawn ssh smeas@lab46.corning-cc.edu
expect "password"
send "mypassword\r"
interact
Data
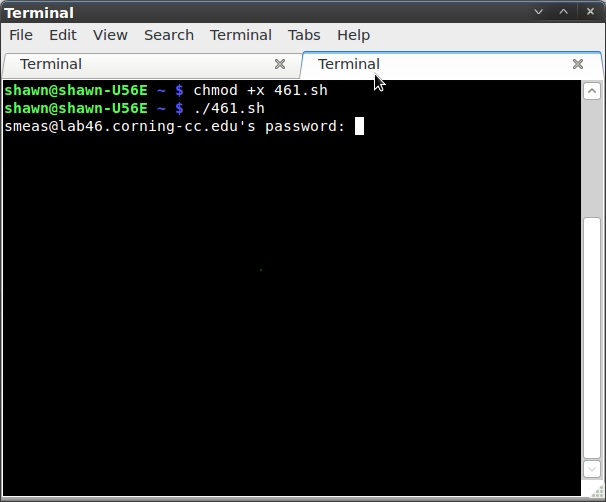
Based on my basic knowledge of scripting, this would first send the ssh command, then wait 3 seconds (which I figured to be an appropriate wait time to receive the password prompt), then send my password. I used the command `chmod +x 46.sh` to allow me to execute the script. Unfortunately, this script failed. It connected to Lab 46 and received the password prompt, but did not enter the password. I attempted to raise the sleep timer to 10, just in case it needed some more time, but it also still stalled out at the password prompt. I feel like my logic was correct, but my syntax was not.
Again, after saving this file as 46.sh, I first ran a `chmod +x 46.sh`. I then executed the script, and as I expected, it worked flawless. In a matter of seconds, I was sitting on the home screen of Lab 46.
Analysis
Based on the data collected, my hypothesis was correct. It was possible to create an ssh connection/login script for Lab 46. There was more going on than I originally though, because I had to download a package which allowed me to use some more commands in a bash script.
One shortcoming of my experiment is that there may have been another way to do it. If so, however, I don't think it would have been any more optimized than my script was. My script involved downloading one very small package, and writing a four line script file. I feel there wouldn't be a more succinct way to achieve this.
Conclusions
Based on the experiment I performed and data I collected, I can ascertain that scripting is a very powerful tool to have in my arsenal. While the amount of time saved between logging in normally, and logging in with my script (which requires only five keystrokes) may only be a few seconds, but I feel like those few seconds will add up over time and make the initial investment more than worth it.
My biggest discovery in this experiment is that the bash scripting language is expandable. It is not limited to the commands available initially. Downloading the “expect” package gave me access to a number of other commands to increase the versatility of my bash script.
Part 2
Entries
Entry 1: October 10th, 2012
Today, we ventured further into the mystical land of bash scripting. Today, we began to work with scripts that accepted arguments. We wrote a script which on it's first run asked us to input our name. On any following execution, if ran without an arguments, the script would return “Welcome back, $name”. If it was ran with an argument, however, it would return the string “Intruder!”
Entry 2: October 19th, 2012
Today we began by talking more about the “ps” and “kill” commands. We went through the list of processes being run, from the start (the processes being run by root when the system booted up). Next we used the “top” command, which is an interactive ps command that shows the top running processes on the system.
Next we talked about the three layers of computing processes. There is the kernel, the modules/drivers, and userspace. The first process running in the userspace is init, and all other processes are a child of that.
The next command we talked about was “whowatch”. This command shows a list of users, and then we can see a tree of their processes.
The next big great new command we talked about was the “sed” command. sed is a stream editor command. We used the sed command to search for any instance of multiple spaces in our ps command, and replace it with only one space. After this, we could use the cut command with spaces as a delimiting character to print only two columns.
Entry 3: October 24th, 2012
Today, we began talking about regular expressions. Regular expressions let us search within a file.
A list of common basic regular expressions is:
$ - match end of line \< - match beginning of word \> - match end of word . - match any single character * - 0 or more of the previous [] - character class - match any of the enclosed [^] - inverted character class - do not match any of enclosed
Extended regular expressions:
( ) - grouping - \( \)
+ - match 1 or more of the previous
Next, we used the regular expressions, along with the grep command, to work with a file that had a list of words. First, we looked for any word that contained “and”. We did this by using “cat words | grep 'and' | wc -l”. Next, we looked for all words that started with “or”, by using “cat words | grep '^or' | wc -l”. The next string we searched for was words starting with either “or” or “Or”. The grep command for this was “grep ^[Oo]r”. And then we went deeper! Starts with “or” or “Or”, and ends with e. “grep ^[Oo]r.*e$”. Up next! Does not start with a lowercase vowel, has a 'g' somewhere, and ends with a 's' or 'e'. “grep ^[^aeiouy].*g.*[se]$”.
Next, we delved into using extended regex's. We used egrep to search for any word ending with “ing” or “ed”. “egrep ing$|ed$”.
Entry 4: October 26th, 2012
Today, we decided to engage in some rudimentary data mining! Sort of. Kind of. Not quite. But it sounds cool. We copied a gzipped file which was the course list for the Spring 2013 semester. While gzipped, the file was only 67 kilobytes. Decompressed however, it ended up being 2.1 megabytes. Next, we opened the file. Since the file is an .html code, there is a lot of code breaking up the actual content of the file. Therefore, we need to get rid of that pesky code to make it easily readable! We noticed that lines with the class name started with “<TH CLASS=“ddtitle””, so we grepped for that.
In order to get rid of some of the extra junk we didn't need, we next used sed. The sed command we used was “sed 's/^.*crn_in=…..”>g'“. After doing this, there were still a few html closing tags at the end of the line, so we got rid of those with the sed command “sed 's/<\/A><\/TH>$g'”. This gave us a plain list of all the courses and their course numbers.
Next, we learned how we could use sed to change the organization of the file. The classes were listed in the format “Title - CRN - Course - Section”. Using a ridiculously long sed command, we changed the format to “Course - Section:CRN:Title”.
Keywords
unix Keyword 2
pipes
Definition
In Unix, a pipe (or pipeline) is used to direct the flow of output from one command as input to another command. This can be used to connect two operations together on a single command line, instead of having to use multiple command line inputs to receive the same result.
In Unix systems, pipes are shown using a vertical bar symbol, |. This bar will take the output from the command on the left, and use it as the input for the command on the right.
An example of this would be:
who | grep $USERThis would execute the who command, and then use it as input to the grep command, which would parse who for all instances of your own username.
References
unix Keyword 2 Phase 2
escape character
Definition
An escape character is a character used to invoke an alternative interpretation of subsequent characters in a sequence. This is generally used when a character on it's own has a specific function.
An example of this (in bash) would be the * wildcard, which is used to expand a name. If a * is needed as a literal character (“*” as opposed to *), an escape character is needed to tell the * not to act as a wildcard. In bash, the escape character is a backslash. Typing \* would treat * as a character, instead of a wildcard.
References
Demonstration
For my demonstration, I'm going to create a few files using symbols which require escape characters, and then show how the escape characters must be used to access these files.
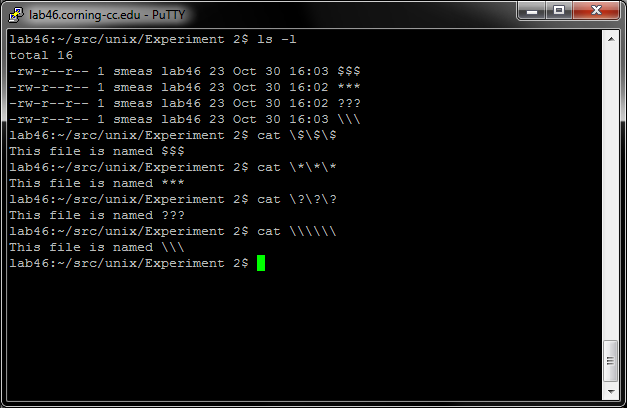
The files I created were named “$$$”, “***”, “???”, and “\\\”
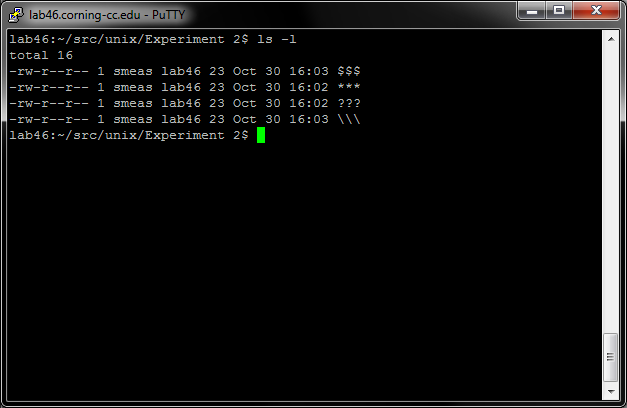
Attempting to access these files by typing in just their names caused different things to happen for each file, based on what the purpose of that file's character was.
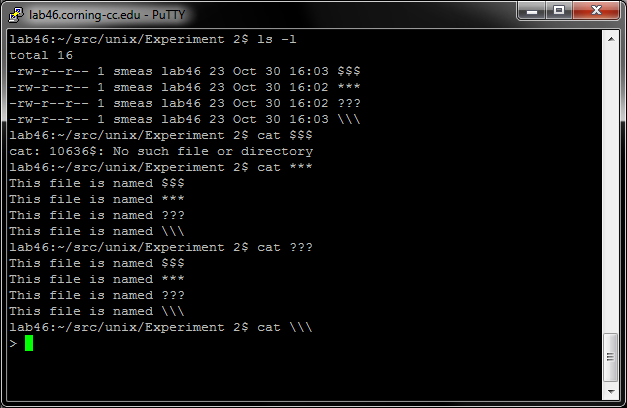
However, if the bash escape character (“\”) was used before each character in the files' names, they were treated as a regular character, instead of a special character.
(I also realized right after taking and uploading these screenshots, I made my demonstration in my Experiment 2 folder on accident. Whoopsie!)
Experiment 2
Question
Is it possible to access a computer running Linux from a computer running Windows, with complete access to the desktop environment and not just a terminal.
Resources
According to this blog, it is possible to do. In order to do it, you must install a VNC client on Windows. According to this blog, the VNC client of choice is TightVNC.
Hypothesis
From what I've read, this seems entirely possible. There seems to be plenty of resources out there that discuss how to do it. According to these, it's much easier to access a Windows PC from a Linux machine, since Linux has VNC built into it. But it's completely possible to access a Linux machine from a Windows machine through a third party VNC client.
Experiment
I'm going to test my experiment by installing the TightVNC program on my desktop running Windows, and attempting to access my laptop running Linux (Mint distro).
Data
As I said, the first step of my experiment was downloading and installing TightVNC on my desktop Windows machine. After the 1,952 kb file downloaded, a at speedy 3.2 kb/s, I installed it.
Next, I installed the tightvncserver program on my Linux machine. After it installed, I ran the program by typing “tightvncserver” into the terminal, and started the server.
When this was done, I used the ifconfig command to get the LAN IP address of my laptop (10.0.0.7) and entered that into the TightVNCViewer on my Windos machine, followed by the default port number (5901).
I was then prompted to input the password for my Linux machine.
When this was done, it connected to my Linux machine… kind of. It showed a few icons, but there was no taskbar or titles for the icons. Upon opening my home folder, it appeared as if it was running a different desktop environment, instead of cloning the output of my laptop.
I decided to search for another VNC viewer client for Windows, since I suspected that was the problem. The next one I came across was UltraVNC. I downloaded and installed this viewer, and decided to give it a shot.
After installing it, I ran the viewer, and again typed in the IP address of my Linux machine.
This one connected quickly, and worked flawlessly the first time. The exact display of my Linux machine was duplicated into a window on my Windows machine. Success!
I've uploaded the screencaps I took for the experiment to an imgur album. I felt it was a lot easier to organize them this way, and made my opus less cluttered. The images are numbered in order, and contain a short description.
Here is the link to the first image in the album.
Analysis
My hypothesis was completely correct. It is possible to access a Linux machine's desktop (not a terminal, through SSH such as with Lab 46) from a Windows machine, through the use of VNC.
There is more going on than I originally thought, as two different VNC viewers for Windows obviously had very different results. While they both connected, one of them had a very undesirable display, whereas the other worked flawlessly. The one downside however seemed to be bandwidth. Both my machines are running over crappy wireless connections, through an even crappier wireless router. I'm sure if they were hardwired, there would be no latency issues whatsoever.
As far as shortcomings in my experiment, I did see other VNC viewers for Windows out there. However, the second one I tried seemd to work beautiful, so I feel there was no need to test any others.
Conclusions
Based on the experiment I performed, I learned that it's possible to access a machine remotely cross-operating system. This is quite handy, as I prefer to run Windows on my desktop, for the games and whatnot. I could easily dual-boot a Linux distro, or possibly even run one in a VM. While they would both probably perform much better, I feel that the small performance hit would be worth it in that I could access the files stored on my Linux laptop from my Windows desktop.
This could come in quite useful, as I generally use my laptop for all my schoolwork. Using VNC, I could work on files on my laptop, while using my comfortable keyboard and mouse, and my monstrous 27” monitor. Far superior to a laptop keyboard and teeny tiny baby screen!
I'll just have to remember to plug in next time. Because WiFi makes high bandwidth transfers sad :(
Part 3
Entries
Entry 1: November 2nd, 2012
Today, we had a lot of FUN! We started exploring the X Window System! To begin with, we all accessed the “grrasp” terminal. Once in the grrasp terminal, we used a who command to see what other people's grrasp addresses were. Using these addresses, we started sending xeyes all over the place! xeyes is an X Window command which sends a pair of eyes to a screen, which follow the mouse. The eyes can be customized with colors, different sizes, locations, etc.
After a little bit of fun messing around with sending the eyes to each other (although, being on my own machine and not one of the LAIR machines, I was invulnerable to penetrating xeyes. Bwahaha!), we powered up the LAIRwall. With the LAIRwall up, we began sending xeyes to the different machines powering the LAIRwall (6 in total, each machine powering two monitors). Again, we messed around with the commands to customize our xeyes. We also send the xlogo to the screen.
Using the DISPLAY variable, we looked up the size of the display, to create a set of xeyes that would fit the monitors perfectly. I looked up some documentation on the X Window System, which showed me the xclock command. This command sent an analog (or digital, if given the right options) clock to the system. Since this was something with no transparency, I used it for a little bit of trolling fun, by sending it large enough to span an entire system's monitors, covering up any xeyes that were brought up. Evil :) Also, Josh and I made eyes follow Evan. We also found the oneko command, which made a cute little kitty cat. Unfortunately, I couldn't quite bring to fruition my plans to summon a giant pink cat to the LAIRwall :(
All in all, it was a very fun class, in which we learned a lot about the X Window System, including how it works between a client and a server.
Entry 2: November 16th, 2012
First off today, we were given the privilege by Matt of evaluating him. Joy, oh, joy!
Then, we got into the actual learning. Today we continued our talk on networking that we began a few weeks ago. Networking is defined as communication among devices between a common medium using common protocols. Networking involves standards (the way things should be done) and protocols (a set of rules). We then got into talking about the TCP/IP protocol.
The Networking layer mainly handles IP addresses. The main IP protocol is currently IPv4, which are 32 bit addresses (approximately 4.2 billion addresses). There is currently a move to IPv6 (128 bit address, approximately a truckload of addresses), as we are apparently out of IPv4 addresses. After all this chit-chat, we got into some terminal commands. We ran /sbin/ifconfig to view our networking interfaces. We were able to use this to see the Lab46 IP address (10.80.2.38). In order for a network to work, every device must have a unique address.
We then dissected the LAIR's IP address. The 38 in the network address is the unique node number of Lab46 on the network it is on. The 2 in the network address identifies the subnet. The LAIR has 3 separate subnets. The 80 in the network address is the LAIR's unique address, whereas an 81 would be SUNY Geneseo, and 82 would be SUNY IT. And the 10 is the base address (meaning the network address is a Class A address, which gives you full control of the three other fields). Any address starting with 10, 172, or 192 is a private address which isn't accessible directly from the Internet. Any other number would be a publicly accessible address. (CCC owns the publicly accessible address 143.66.xxx.yyy).
Then we talked a little about how IPv6 has been released and devices support it, but everyone is stuck on the IPv4 standard, because change is scary.
The transport layer is basically the UPS guy. It transmits packets from one device to another.
The Application layer is the end level. A web browser is an application layer level service, which uses three common protocols (HTTP, FTP, and HTTPS). The most well known form of data transferred over HTTP is HTML.
Entry 3: November 28th, 2012
Today we mainly had a work day in UNIX. The LAIR received some fresh, recycled machines today, so I decided to grab one for my personal LAIR use. I spent the day downloading and installing Ubuntu on my machine. Since Unity is pretty much garbage, I downloaded the LXDE desktop environment, and spent the rest of the day working on customizing a theme in LXDE, which involved editing a ridiculously awfully formatted XML file. I managed to get my window colors to the correct color, but for some reason my taskbar is being rather obstinate and I can't seem to get it to change its color to the color I want. So, hopefully that gets solved soon!
Entry 4: November 30th, 2012
Yet another day of more work! I spent today first off trying to get a wallpaper image to span both my desktops, which I could not figure out for the life of me. After about an hour of no success, I decided to work on creating a startup script to run the commands I run upon startup. After creating a script which worked, I then found out there was an even easier way to do it! So, that's what I did! And to make things even better, in the process, I got my wallpaper to span both desktops, without even trying. Double win!!
Keywords
unix Keyword 3
Comm
Definition
“comm” is a UNIX command which can be used to compare two sorted files. The input for comm is two files, and the output is two separate columns. The command syntax for comm is
comm [OPTION]... FILE1 FILE2
comm has three main options, -1, -2, and -3.
The -1 option will print the lines present in FILE1 in the left hand column, and all common lines in the right hand column, whereas the -2 option will do the opposite (print lines present in FILE2 on the left, and common lines on the right). The -3 option, however, will only print lines unique to both files, with FILE1's unique lines being on the left, and FILE2's unique lines on the right.
References
- man comm!
unix Keyword 3 Phase 2
Identification of chosen keyword: umask
Definition of umask
The command umask is used to determine file modes at creation. Using umask on a file will determine the permissions of that file and all child processes resulting from that file. umask was used on Super Puzzle Box 2 Turbo (vim setup.exe). Where chmod changes permissions on a file, umask sets the initial permissions. In Super Puzzle Box 2 Turbo (the best Puzzle Box this side of the Danube), when the datafile is created, umask is used to set permissions to (octal) 777, ensuring that permissions will not be an issue when working with the file.
lab46:~$ umask u=rwx,g=,o=
lab46:~$ mkdir goop; cd goop
lab46:~/goop$ touch trees
lab46:~/goop$ mkdir pain
lab46:~/goop$ ls -l
total 0
drwx------ 2 dsherbur lab46 6 Nov 14 15:19 pain
-rw------- 1 dsherbur lab46 0 Nov 14 15:18 trees
Setting the umask values to what would be octal 700, which gives all permissions to the user and owner and no permissions to group or other, I have made private files. Changing umask again changes the permissions of newly created files.
lab46:~$ umask u=rwx,g=rwx,o=rwx
lab46:~$ cd goop
lab46:~/goop$ ls -l
total 0
drwx------ 2 dsherbur lab46 6 Nov 14 15:19 pain
-rw------- 1 dsherbur lab46 0 Nov 14 15:18 trees
lab46:~/goop$ touch park
lab46:~/goop$ ls -l
total 0
drwx------ 2 dsherbur lab46 6 Nov 14 15:19 pain
-rw-rw-rw- 1 dsherbur lab46 0 Nov 14 15:22 park
-rw------- 1 dsherbur lab46 0 Nov 14 15:18 trees
Note the difference in the umask line from the first block to the second block. We can use this to prank people who leave their terminals open by setting the umask vales to 0 across the board, making files that they create themselves unaccessible. However, umask can be changed and the files created under the permissionless umask and be changed via chmod to be accessible.
lab46:~/goop$ umask u=,g=,o=
lab46:~/goop$ touch jello
touch: setting times of `jello': Permission denied
lab46:~/goop$ ls -l
total 0
---------- 1 dsherbur lab46 0 Nov 14 15:26 jello
drwx------ 2 dsherbur lab46 6 Nov 14 15:19 pain
-rw-rw-rw- 1 dsherbur lab46 0 Nov 14 15:22 park
-rw------- 1 dsherbur lab46 0 Nov 14 15:18 trees
lab46:~/goop$ vim jello
lab46:~/goop$ chmod 777 jello; ls -l
total 0
-rwxrwxrwx 1 dsherbur lab46 0 Nov 14 15:26 jello
drwx------ 2 dsherbur lab46 6 Nov 14 15:19 pain
-rw-rw-rw- 1 dsherbur lab46 0 Nov 14 15:22 park
-rw------- 1 dsherbur lab46 0 Nov 14 15:18 trees
When I vim'd jello, i was greeted with a permission denied screen and I was unable to modify or write to the file, verifying the initial permissions of the file.
References
List any sites, books, or sources utilized when researching information on this topic. (Remove any filler text).
- Reference 1
- Reference 2
- Reference 3
unix Keyword 3 Phase 2 Phase 2
umask
Definition
umask is a command in Linux/UNIX systems that can be used to determine a the default permissions granted to any file upon creation of the file.
References
- man umask
Demonstration
For my demonstration, I'll be creating a file, then changing the umask, and creating another file.
The first file was created with the default umask.
lab46:~/umask$ ls -la
total 4
drwxr-xr-x  2 smeas lab46    6 Dec 13 16:54 .
drwx-----x 28 smeas lab46 4096 Dec 13 16:53 ..
lab46:~/umask$ vi test
lab46:~/umask$ ls -la
total 4
drwxr-xr-x  2 smeas lab46   17 Dec 13 16:57 .
drwx-----x 28 smeas lab46 4096 Dec 13 16:57 ..
-rw-r--r--  1 smeas lab46    0 Dec 13 16:57 test
lab46:~/umask$
Unlike normally when you chmod a file, the umask settings are the opposite (in chmod, 0 is no permissions, 7 is all permissions). Here is a list of the permissions granted by umask.
Octal value : Permission
0 : read, write and execute
1 : read and write
2 : read and execute
3 : read only
4 : write and execute
5 : write only
6 : execute only
7 : no permissions
I then changed the umask using the command “umask 111” and created a second file. This file was created with read and write permissions for everyone.
lab46:~/umask$ umask 111
lab46:~/umask$ vi test2
lab46:~/umask$ ls -la
total 4
drwxr-xr-x  2 smeas lab46   29 Dec 13 17:02 .
drwx-----x 28 smeas lab46 4096 Dec 13 17:02 ..
-rw-r--r--  1 smeas lab46    0 Dec 13 16:57 test
-rw-rw-rw-  1 smeas lab46    0 Dec 13 17:02 test2
lab46:~/umask$
Experiment 3
Question
Can I set up a startup script to automatically run when I boot my LAIR PC to run the four commands I always run upon startup?
Resources
Matt Haas! Matt told me that using an & at the end of my commands in my startup-script would cause the script to not halt on certain commands.
https://wiki.archlinux.org/index.php/LXDE#Autostart_Programs According to this wiki article, there is an autostart file, in which any command can be placed (preceded by an @ symbol), and it will run upon startup.
Hypothesis
I assume that I'll be able to do this. I know from class that I can create a script file that will run a set of commands, it's just a matter of finding a way to make it automatically execute upon startup.
Experiment
I first plan on writing the script file, and making sure that running the script file will execute all of the actions. Then I plan on making the script file automatically executable upon login so that I don't have to do any work at all when I log in (yay for laziness!)
Data
I created autostart file in ~/.config/lxsession/LXDE and edited it as follows
@pkill lxpanel
@xfce4-panel &
@xcompmgr &
@xrandr --output DVI-1 --auto --left-of DVI-0
This first kills the lxpanel process, then starts the much prettier xfce4-panel. It then executes xcompmgr, which leads to pretty windows. And lastly, the xrandr command switches my monitors from cloning displays, to extend the desktop, with the lefthand monitor (DVI-1) being on the left, and the right monitor (DVI-0) on the right.
This correctly executed the commands, but, for some reason, my wallpaper was not there. I found a program called nitrogen which could be used to set up a background image. I ran nitrogen, with the parameter for the folder my wallpaper was stored in (~/Wallpaper), and selected my background image. I then added the following line to my autostart file.
@nitrogen --restore
After this, I did a quick log in and log out, and everything worked perfectly! I had xfce4-panel running, xcompmgr running, and my desktop extending across both monitors, as well as having the correct background image. Woo, laziness!
Analysis
Based on the data collected, my hypothesis was correct. It ended up being achieved in a completely different way though. My hypothesis was to create a script, and then set it to automatically execute on login. However, I found out in LXDE that there is an autostart file which will automatically run commands. My hypothesis is definitely applicable, as it can be done quite easily, and with no real problems that I can see.
One shortcoming in my experiment is that there may be more that could be done with executing scripts instead of just running commands. But, my script was only going to be used to run commands, so the autostart approach works wonderfully.
Conclusions
In conclusion, I've come to even more of a realization of why I love Linux more than Windows. It's awesome that I can automate so many things that I do, to allow me to be even lazier. And we all know laziness is a good thing! Now I have this beautifully looking desktop running all the time, with a great color scheme, some glorious transparent terminals, and an awesome wallpaper spanning both monitors (X and Zero!)