User Tools

Site Tools


Sidebar

projects

wcp1 (due 20240828)
wcp2 (due 20240904)
pct0 (bonus; due 20240905)
pct1 (bonus; due 20240905)
pct2 (due 20240905)
abc0 (due 20240906)
gtf0 (due 20240911)
pct3 (bonus; due 20240911)
wcp3 (due 20240911)
dtr0 (due 20240918)
pct4 (due 20240918)
wcp4 (due 20240918)
pct5 (bonus; due 20240926)
stl0 (due 20240926)
wcp5 (due 20240926)
gfo0 (due 20241002)
pct6 (due 20241002)
stl1 (due 20241002)
wcp6 (due 20241002)
pct7 (bonus; due 20241009)
stl2 (due 20241009)
wcp7 (due 20241009)
bwp1 (bonus; due 20241016)
pct8 (due 20241016)
ptb0 (due 20241016)
wcp8 (due 20241016)
pct9 (bonus; due 20241023)
ptb1 (due 20241023)
wcp9 (due 20241023)
gfo1 (due 20241030)
pctA (due 20241030)
ptb2 (due 20241030)
wcpA (due 20241030)
pctB (bonus; due 20241106)
wcpB (due 20241106)
wus0 (due 20241106)
pctC (due 20241113)
wcpC (due 20241113)
wus1 (due 20241113)
pctD (bonus; due 20241120)
wcpD (bonus; due 20241120)
wus2 (due 20241120)
bwp2 (bonus; due 20241204)
gfo2 (due 20241204)
pctE (bonus; due 20241204)
wcpE (bonus; due 20241204)
EoCE (due 20241216)
haas:fall2024:c4eng:projects:epf1

Corning Community College

ENGR1050 C for Engineers

Project: ELECTRONICS PI FUN - LEDBAR BINARY COUNTER (epf1)

Objective

To adapt your bcf0 program to, instead of displaying values to STDOUT, instead lights up LEDs on the LEDbar, so the binary counter, in incrementing or decrementing fashion, is better visualized.

Reading

In “The C Book”, please read through Chapter 5.

Diagram

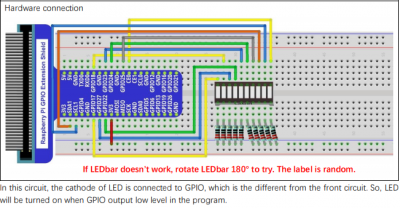
To refresh your memory, here is a diagram of the circuit you can build to drive the LEDbar:

Be sure to use 220 Ohm resistors for this.

Program

It is your task to adapt your bcf0 program so that, upon accepting various pieces of input from the user, acts as a binary counter, lighting up the resultant LEDs in binary (1 being on, 0 being off), inserting an adequate delay so we can watch as it proceeds from a starting to an ending value.

Specifications

Your program should:

  • have valid, descriptive variable names of length no shorter than 4 symbols
  • have consistent, well-defined indentation (no less than 4 spaces per level of indentation)
    • all code within the same scope aligned to its indentation level
  • have proximal comments explaining your rationale and what is going on, throughout your code
  • to STDERR, prompt for the starting value (0-1023)
    • properly store this in a variable of type signed short int
  • to STDERR, prompt for the ending value (0-1023)
    • properly store this in a variable of type signed short int
  • immediately after each input, check to make sure starting and ending values fall appropriately in the range stated; if in violation, display an error (to STDERR) and exit with a non-zero value.
  • check the starting and ending values to determine if we are to perform an incrementation or a decrementation.
  • in binary, display the starting number and all the others as well to the LEDs
  • proceed to the next value in sequence, doing the same
  • keep going until you have arrived at the ending value, visualizing it on the LEDs it as well
  • using a single return statement at the conclusion of the code, return a 0 indicating successful operation
  • if you do not have an LEDbar component (or a fully working LEDbar component), substitute as appropriate with individual LEDs (don't forget the resistors!)

Some additional points of consideration:

  • Note that the driving variables in your loops need to be at least of type short int, otherwise you may get a warning when you compile it.

Execution

Sample incrementation run

pi@raspberrypi:~/src/c4eng/epf1$ ./epf1
Enter starting value (0-1023): 12
Enter ending value (0-1023): 28
pi@raspberrypi:~/src/c4eng/epf1$ 

The execution of the program is short and simple- obtain the input, do the processing, produce the output, and then terminate.

Sample decrementation run

pi@raspberrypi:~/src/c4eng/epf1$ ./epf1
Enter starting value (0-1023): 17
Enter ending value (0-1023): 0
pi@raspberrypi:~/src/c4eng/epf1$ 

Sample run with invalid input given (scenario 1)

lab46:~/src/c4eng/epf1$ ./epf1
Enter starting value (0-1023): 5543
ERROR: input value must be between 0-1023!
lab46:~/src/c4eng/epf1$ 

Sample run with invalid input given (scenario 2)

lab46:~/src/c4eng/epf1$ ./epf1
Enter starting value (0-1023): 255
Enter ending value (0-1023): 7168
ERROR: input value must be between 0-1023!
lab46:~/src/c4eng/epf1$ 

Obtaining binary values

You might wonder how, when you are limited to non-binary input, how you can obtain the binary value so that you can work with it.

There are a couple ways to go about this:

Method one: convert from decimal to binary

Using the division method, you can convert a decimal value to binary, continually dividing the value (or its quotient) by the base, until the quotient is 0, then we use the remainders to give us the binary value:

  • value / base
  • value = 15
  • value / 2
    • ie: 15 / 2
      • quotient: 7
      • remainder: 1
  • value = quotient
  • value / 2
    • ie: 7 / 2
      • quotient: 3
      • remainder: 1
  • value = quotient
  • value / 2
    • ie: 3 / 2
      • quotient: 1
      • remainder: 1
  • value = quotient
  • value / 2
    • ie: 1 / 2
      • quotient: 0
      • remainder: 1

The binary for 15 (decimal) is 1111 (binary)

Or:

  • value = 11
  • value / 2
    • quotient: 5
    • remainder: 1
  • value = 5
  • value / 2
    • quotient: 2
    • remainder: 1
  • value = 2
  • value / 2
    • quotient: 1
    • remainder: 0
  • value = 1
  • value / 2
    • quotient: 0
    • remainder: 1

The binary for 11 (decimal) is 1011 (binary).

NOTE that the order in which we get the remainders produces the number from right to left.

Method 2: bitwise AND the place values

If one understands the weight values corresponding with the places of each bit in a binary number, we can simply do a bitwise AND and see if the result is greater than 0 or not:

2 to the 7 2 to the 6 2 to the 5 2 to the 4 2 to the 3 2 to the 2 2 to the 1 2 to the 0
128 64 32 16 8 4 2 1

So, if we wanted to see if the 2 to the 7th bit is active, we can simply:

    value  = number & 128;

We can then check of value is greater than 0; if it is, we've got a 1 in that position, if it isn't, we have a 0.

We can then repeat the operation for 64, 32, 16, etc. down to 1, to get each bit of our number.

NOTE that I have only taken us out to 8-bits. You may need to extend this to incorporate all the allowed values for this project.

Submission

To successfully complete this project, the following criteria must be met:

  • Code must compile cleanly (no warnings or errors)
  • Output must be correct, and match the form given in the sample output above.
  • Code must be nicely and consistently indented
  • Code must be well commented
  • Do NOT double space your code. Group like statements together.
  • Output Formatting (including spacing) of program must conform to the provided output (see above).
  • Track/version the source code in a repository
  • Submit a copy of your source code to me using the submit tool.

To submit this program to me using the submit tool, run the following command at your lab46 prompt:

$ submit c4eng epf1 epf1.c
Submitting c4eng project "epf1":
    -> epf1.c(OK)

SUCCESSFULLY SUBMITTED

You should get some sort of confirmation indicating successful submission if all went according to plan. If not, check for typos and or locational mismatches.

haas/fall2024/c4eng/projects/epf1.txt · Last modified: 2019/09/30 19:08 by 127.0.0.1