Sidebar
Table of Contents
Data Structures Course Notes Wiki
09/02/2014
Pointers
Pointers refer to memory, and they give C its cosmetic cosmic power.
- first and foremost, what is a variable? A variable is the name for a place where the computer stores some data. Every time you create a variable, memory is allocated for it. The storage and retrieval of memory is managed by the operating system.
Ex:
int a;
Here you've created a variable, and there is some data within this variable.
- A Pointer is a variable that contains a memory address. It references a location in memory and it contains nothing but a memory address. In order to use a pointer we must be able to point at something.
Ex:
int *C;
the asterisk is known as the differencing operation.
Different 'types' are allocated to pointers, such as int (integer), float (floating point number), and char (character)
A memory address contains 8 bytes.
If memory was represented by a rectangle with 8 rows and 8 columns, each box corresponding to a line and a column will represent a byte of memory. Every byte in memory is addressable. This memory is predominantly stored in RAM (Random Access Memory) and it is recommended.
Memory addresses are referenced in hexadecimal. By treating it as a hexadecimal value we are less prone to interpret it. It takes 2 hex digits to denote a byte
       1 byte = 8 bits
          2^8 = 256 bits
Every two hex digits would be a byte.
An 8 bit processor can grab a byte of information per fetch, and a 32 bit processor can fetch 4 bytes of information per fetch, likewise a 64 bit processor allows you to grab more information for a unit of time. The larger the number of bits in a processor means that its addressing region gets bigger and bigger.
Ex:
  2^8  = 256
  2^16 = 65536
  2^32 = 4294967296
  2^64 = 18446744073709551616
Following is a hexadecimal representation of a byte
0 * 00 00 00 00 00 00 00 00
09/04/2014
nano pointerfile1.c
We wrote two programs in class using integer pointers, character pointers, and pointers to the memory address of each of these. Every integer or character has an address given at runtime. This was created and designed by Matt Haas(Wedge) to provide us with simple uses and visual references of pointers.
The following is code that we explored:
- pointerfun.c
        #include <stdio.h>
        int main()
        {
             int a;
             int *b;
             char c;
             char *d;
- int a; -is an integer
- int *b; -is calling the address at b
- char c; -is a character pointer
- char *d; -is calling for the address at d
             a = 17;
             b = &a;
             c = 'X';
             d = &c;
- a is assigned as 17
- b is assigned as the address of a
- c is assigned as the character X
- d is assigned as the address of c
             printf("address of a is: %p\n", &a);
             printf("address of b is: %p\n", &b);
             printf("address of c is: %p\n", &c);
             printf("address of d is: %p\n", &d);
             printf("-----------------------------\n");
- printf of the the above code display's the memory address of Variables.
             printf("a contains: %d\n", a);
             printf("b contains: %p\n", b);
             printf("c contains: '%c' (%hhd)\n", c, c);
             printf("d contains: %p\n", d);
             printf("-----------------------------\n");
- printf of the above code displays what is contained in the space at each of the addresses.
             printf("b dereferenced is: %d\n", *b);
             printf("d dereferenced is: '%c' (%hhd)\n", *d, *d);
             printf("-----------------------------\n");
- When a pointer is dereferenced, the computer will access the contents of what the address pointer contains. Printf displays the derefrenced memory address.
             printf("a is %d bytes\n", sizeof(a));
             printf("b is %d bytes\n", sizeof(b));
             printf("c is %d bytes\n", sizeof(c));
             printf("d is %d bytes\n", sizeof(d));
             printf("-----------------------------\n");
- These printf statements display the byte size of each individual statement.
             return(0);
             }
Then we made the following changes to the code:
nano pointerfile2.c
- pointerfile2.c
             #include <stdio.h>
             int main()
             {

             int 17;
             int *b;
             char c;
             char *d;

             a = 17;
             b = &a;
             c = 'X';
             d = &c;

             printf("address of a is: %p\n", &a);
             printf("address of b is: %p\n", &b);
             printf("address of c is: %p\n", &c);
             printf("address of d is: %p\n", &d);
             printf("-----------------------------\n");

             printf("a contains: %d\n", a);
             printf("b contains: %p\n", b);
             printf("c contains: '%c' (%hhd)\n", c, c);
             printf("d contains: %p\n", d);
             printf("-----------------------------\n");

             printf("b dereferenced is: %d\n", *b);
             printf("d defeferenced is: '%c' (%hhd)\n", *d, *d);
             printf("-----------------------------\n");

             printf("a is %d bytes\n", sizeof(a));
             printf("b is %d bytes\n", sizeof(b));
             printf("c is %d bytes\n", sizeof(c));
             printf("d is %d bytes\n", sizeof(d));
             printf("-----------------------------\n");

             *b = 32;
             *d = 'J' - 6;
- The dereferenced values of the pointers b and d
- The address of b was assigned to 32.
- The address of d was assigned to the character J minus 6
              printf("a contains: %d\n", a);
              printf("b contains: %p\n", b);
              printf("c contains: '%c' (%hhd)\n", c, c);
              printf("d contains: %p\n", d);
              printf("-----------------------------\n");

              printf("b dereferenced is: %d\n", *b);
              printf("d defeferenced is: '%c' (%hhd)\n", *d, *d);
              printf("-----------------------------\n");

              return(0);
              }
The class ended with Matt Haas suggesting we go explorer the vast usefulness of pointers, such that this could be implied or pointed to as homework.
09/09/2014
Array: homogenous composite data type
It is containers of the same data types
heterogenous composite data type.
container of different data types
Structure(Struct):
Review of structs - write a program
int b[4];
int *b;
b = (int *)malloc(sizeof(int)*4);
b[0] = 2; etc..
*(b+0) = 2;
#include<stdio.h>\\
int main()\\
{
    struct thing { //defines existance of struct thing
   	 int a; //member variables of struct thing
   	 char b;
    }; //struct final } needs semicolon after it

    struct thing stuff; //declares and instance of struct thing

    //Assigning values to members of struct thing called stuff
    stuff.a = 57;
    stuff.b = 66;

    //printing members of struct thing called stuff
    printf("stuff's a member is: %d\n", stuff.a);
    printf("stuff's b member is: '%c'(%hhd)\n", stuff.b, stuff.b);

    return(0);
}
Node:
circle with value inside
can point to other nodes
Linked list: nodes pointing to each other and ending at NULL
(int*) ←- type cast
raw memory is (in C) void*
Program Code Unfinished
#include<stdio.h>
#include<stdlib.h>
struct node {
  	char value; //value bucket
  	struct node *next; //points to the struct node
};
typedef struct node Node; for us to make typing easier
int main()
{
char input;
Node *tmp = NULL; value is NULL and the pointer points to NULL
  	//give me raw mem as big as 1 Node and stamp as a Node*
  	//IMPORTANT
  	tmp = (Node*)malloc(sizeof(Node)*1);
09/11/2014
Some Interesting Balloon Drawing
We started the day from a program unfinished from Tuesday
The first node is a variable without the “variable”
Data is then stored inside of the first node via a struct pointer
pointer→member = something;
tmp —> Null
tmp —> balloon (12) —> Null
tmp —> balloon (12) —> balloon
tmp —> balloon (12) —> balloon (3) —> Null
The code that we worked on throughout class:
#include<stdio.h> \\
#include<stdlib.h> \\
struct node { \\
char value; //value bucket \\
struct node *next; \\
 }; \\
typedef struct node Node; //for us to make typing easier \\

int main() \\
{ \\
char input; \\
Node *tmp = NULL, *tmp2 = NULL; \\
tmp = (Node*)malloc(sizeof(Node)); \\
tmp->value = 12; \\
tmp->next = (Node*)malloc(sizeof(Node)); \\
tmp->next->value = 3; \\
tmp->next->next = (Node*)malloc(sizeof(Node)) \\
tmp->next->next->value = 42; \\
tmp->next->next->next = NULL; \\
tmp2 = tmp; \\
tmp = tmp->next; \\
For Unix: Relative Reference
Linked List
- unending,dynamic
Array
- performance
space - time
- solutions are bound by these
Looking forward to these topics in the future! :
Hashtables
Que's
Mixtures of Array's and Linked lists
09/16/2014
To get the files necessary for the node0 project you need to execute the following commands
Navigate to your src directory (or the directory where you store files for this class)
cd ~/src
In this directory run grabit to get the files
grabit
The command should create a directory named node0 and should contain the following directory structure
inc/
lib/
src/
  node/
  list/
  stack/
  queue/
  tree/
  hash/

testing/
  node/
    app/
    unit/
  list/
    app/
    unit/
  stack/
    app/
    unit/
The node0 directory contains /bin for all executables, /lib for all of the libraries, and /inc for all the header files.
Roles
Library developer: makes all the supporting functions
Application developer: makes the program that does the useful things by taking the supporting functions
End User: uses the program
Makefiles
A Makefile is a set of “rules” for compiling and running programs.
When compiling the “-wall” command turns all warning to errors.
You can use the makefile by running the command “make”.
make : builds/compiles the file (the most useful one)
  make debug : builds/compiles the file with the debugger on
  make clean : erases all you your compiled work, but NOT the source code
  make submit: to submit the current project
  make upgrade : node1  -  upgrade to Node1 (the second project)
  make help : for any other commands or help using the other ones
  make update : to update the make file
  after you do this you should always do a "make clean" then a "make"
When you use the “make” command all of your executable files get put into the bin directory
node0 Project
Located in src/“wherever you put the node file”/node0/testing/node/app
In the testing/node/app directory are 3 files. Two of them are standalone files that help you understand nodes better (node-app-test.c and node-app-test2.c) and the project, node-app-display.c.
To compile them you should be in the node0 home directory then run “make”
To run them go into the /bin directory then ./“filename”
The goal of the project is to display the values that get placed into the nodes when you run the program. Reference the standalone programs for help.
Example: If the values 7, 5, 4, 73, and 126 were placed into the program it should display 7→5→4→73→126→NULL
For node-app-test2.c we had to draw a picture. The output should be something like this:
tmp  points to 0x1484010, contains: 8, tmp's next is: 0x1484030
tmp2 points to 0x1484030, contains: 28, tmp2's next is: 0x1484070
tmp3 points to 0x1484050, contains: 17, tmp3's next is: 0x1484030
tmp4 points to 0x1484070, contains: 26, tmp4's next is: (nil)
This is about what the output should look like
09/18/2014
We started by fixing the Makefile for node0
Change into your node0 folder then run command fixit
lab46:~/src/Data/node0$ fixit
Copying base Makefile from /var/public/data/fall2014/node0 ...
    '/var/public/data/fall2014/node0/Makefile' -> '/home/mgardne8/src/Data/node0/Makefile'
Matt Strongly suggested we view the new make help
lab46:~/src/Data/node0$ make help
*********************************************************
*** NEW UPDATE AVAILABLE: Type 'make update' to apply ***
*********************************************************

****************[ Data Structures List Implementation ]*****************
** make                     - build everything (libs and testing)     **
** make debug               - build everything with debug symbols     **
**                                                                    **
** make libs                - build all supporting libraries          **
** make libs-debug          - build all libraries with debug symbols  **
** make testing             - build unit tests                        **
** make testing-debug       - build unit tests with debugging symbols **
**                                                                    **
** make save                - create a backup archive                 **
** make submit              - submit assignment (based on dirname)    **
** make update              - check for and apply updates             **
**                                                                    **
** make clean               - clean; remove all objects/compiled code **
** make help                - this information                        **
************************************************************************
We applied all new updates
To apply the new update: Run the command: make update
lab46:~/src/Data/node0$ make update
Update 1 COMMENCING
Update 1 CHANGE SUMMARY: Fixed base and other Makefile typos
    Please reference errata section on project page for more information
Update 1 COMPLETE
Update 2 COMMENCING
Update 2 CHANGE SUMMARY: Ensure sane permissions for files
    Please reference errata section on project page for more information
Update 2 COMPLETE
Updated from revision 0 to revision 2
Linked list
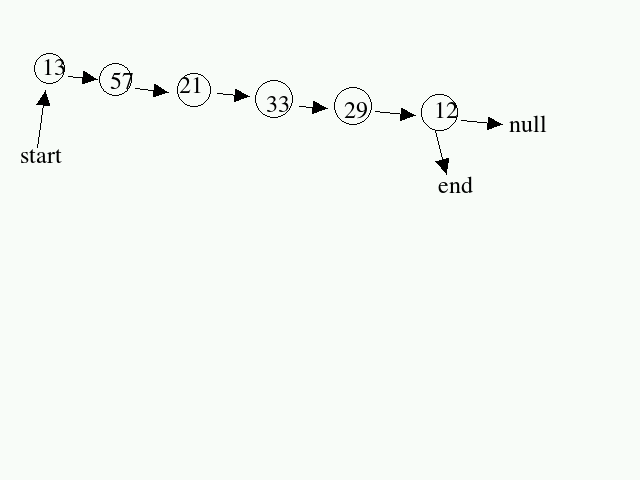
singly linked list : temp->(12)->(57)->(26)->NULL
A singly linked list is a list that only links in one direction. For example the above list is only linked to the next value and once you get to the next value you must start over in order to back up.
doubly linked list : NULL<->(12)<->(57)<->(26)<->NULL
Now there is also a doubly linked list, a list in which you can travel through the list in either direction due to backwards links and pointers.
List Functions
We will be given the first three functions listed below for use with linked lists we will be creating the next two functions linked list Functions
  cplist()     copy list
  rmlist()     removes the list element by element
  mklist()     makes the list?
  insert()     add a node BEFORE specified node
  append()     add a node AFTER specified node
  obtain()     disconnect specified node from list
  displayf()   Display list from the beginning to the end
  displayb()   Display list from the end to the beginning
  search()     Searches list for a value
  sortlist()   Sorts list for based on criteria
  swap()       Swaps two nodes in list
Submit can now be used to see your status on projects
lab46:~/src/Data/node0$ submit data
data projects:
    intro, submitted on 20140911-085637
    node0, due on 20140924 (in 6 days)
    node1, due on 20141001 (in 13 days)
09/23/2014
Today in class we previewed the node1 project.
*You obtain the node1 project by running the command:
make upgrade-node1. We were also reminded to finish the first node project; Node0.
Then we briefly explored Node1, Soon after we started looking at the functions provided for us. The source code for these functions are located in:
~/src/data/node1/src/node
The three functions are mk.c, rm.c and cp.c
mk.c is a Node making function an example of how to use mk node follows:
node *tmp3,*tmp4;

tmp3=mknode(8);
cp.c is a Node copying function an example of how to use cp node follows.
node *tmp3,*tmp4;

tmp3=mknode(8);
tmp4=cpnode(tmp3);
rm.c is a Node removal function an example of how to use rm node follows.
tmp3=rmnode(tmp3);
There is more information located in the node1 project page.
09/25/2014
In this class we talked about insert and append. In order to understand it better, we not only took notes, we also drew pictures. By drawing pictures it made it easier to visualize as well as understand how insert and append works.
What does insert and append do?
insert and append slips something (in this case a node) into an existing list.
- insert - slips the node before the specified node.
- append - slips the node after the specified node.
However, one point to remember!
Assume you have an empty list. In such a case the node that you are inserting becomes the list.
In order to demonstrate how insert and append works, we were introduced to some sample code.
Inserting to the beginning of a list:
Initial Setup:
tmp → 13
tmp2 → NULL
start → 13 ← tmp
Inserting new node(tmp2) before tmp(13):
tmp2 → 27
start → 13 ← tmp
   tmp2 -> next = tmp;
   start        = tmp2;
start, tmp2 → 27 → 13 ← tmp
Inserting new node(tmp2) before tmp(13):
start → 27 → 13 ← tmp
tmp2 → 59
tmp2 -> next  = tmp;
start -> next = tmp2;
start, tmp2 → 27 → 59 → 13 ← tmp
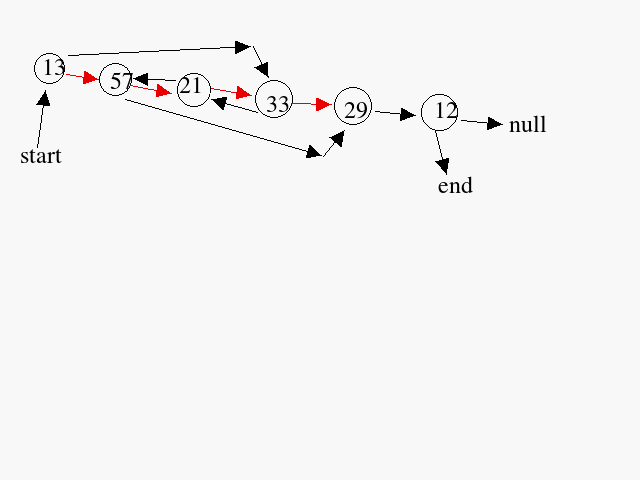
Inserting to the middle of a list:
                          tmp
                           |
                           v
start -> 27 -> 59 -> 13 -> 42 -> 47 -> 64 -> 73 -> NULL
tmp2 -> 37\\
tmp2 -> next = tmp;
                          tmp
                           |
                           v
start -> 27 -> 59 -> 13 -> 42 -> 47 -> 64 -> 73 -> NULL
                           ^
                           |
                   tmp2 -> 37
   tmp = start;                     // tmp point to start, which is 27
   while(tmp->next != tmp2->next)   // loops until tmp->next is 13
   {
        tmp = tmp -> next;
   }
   tmp -> next = tmp2;              // tmp -> 13 -> 37 <- tmp2
Insert node code:
#include <stdio.h>
#include <stdlib.h>

struct node{
        char value;
        struct node *next;
};

typedef struct node Node;

int main()
{
        Node *tmp, *tmp2, *start, *end;
        tmp = tmp2 = start = end = NULL;
        char input;
        int i;

        printf("Enter a value (-1 to complete)\n ");
        scanf(" %hhd", &input);

        while(input != 1){
                if(start == NULL){
                        start = end = (Node *)malloc(sizeof(Node));
                        start->value = input;
                        end->next = NULL;
                }
                else{
                        end->next = (Node *)malloc(sizeof(Node));
                        end->next->value = input;
                        end->next->next = NULL;
                        end = end->next;
                }
                printf("Enter a value (-1 to complete)\n ");
                scanf(" %hdd", &input);
        }

        //display list

        printf("Enter value of new node: ");
        scanf(" %hhd", &input);
        tmp = (Node *)malloc(sizeof(Node));
        tmp->value = input;
        tmp->next = NULL;

        printf("Enter node value to insert before: ");
        scanf(" %hdd", &input);

        tmp2 = start;

        while(tmp2->next->value != tmp->value)
                tmp2 = tmp2->next;

        tmp->next = tmp2->next;
        tmp2->next = tmp;

        //display the list

        return 0;
}
09/30/2014
We went over the sll0 project. More information can be obtained from the projects page on the wiki. We also learned a little bit about the debugger.
To compile with debugger support you type in gcc -g -o executable “name” “file_name” To run the program with the debugger you type gdb ./“file_name” You can also run the program normally without debugger support
A few commands for the debugger are:
- run : runs the program
Reading symbols from ./sll...done.
(gdb) run
- break : sets a break point so the program will run all lines up until the line that the break point was set
(gdb) break 55
Breakpoint 1 at 0x4008e8: file sll-debug.c, line 55.
- list : lists the first 10 of the program(with line #)
(gdb) list
6               struct node *next;
7       };
8       typedef struct node Node;
9       void display(Node *);
10      int main()
11      {
12              Node *start, *end, *tmp, *tmp2;
13              char input;
14
15              start        = end = tmp = tmp2 = (Node *) malloc (sizeof(Node)*1);
(gdb)
- display : displays the value of the specified variable and it is updated each step in the program
(gdb) display tmp2->value
1: tmp2->value = 1 '\001'
(gdb)
(gdb) s
56                      tmp2 = tmp2 -> next;
1: tmp2->value = 1 '\001'
(gdb) s
55              while (tmp2 -> next -> value != input)//used to be tmp -> value)
1: tmp2->value = 2 '\002'
(gdb) s
56                      tmp2 = tmp2 -> next;
1: tmp2->value = 2 '\002'
(gdb)
- print : prints what value the variable holds at that moment
(gdb) print tmp2->next->value
$1 = 3 '\003'
(gdb)
- [s]tep : runs the next step of the program (will step inside function calls)
Breakpoint 1, main () at sll-debug.c:15
15              start        = end = tmp = tmp2 = (Node *) malloc (sizeof(Node)*1);
(gdb) s
16              tmp -> value = 0;
(gdb) s
17              tmp -> next  = NULL;
(gdb) s
19              fprintf(stdout, "Enter a value (-1 to complete): ");
(gdb) s
20              fscanf(stdin, "%hhd", &input);
(gdb)
- [n]ext : runs the next step of the program (does not step inside function calls (will treat a function call as a single line)
- [c]ontinue : runs the program normally from the last stoping point
Starting program: /home/mb006142/src/data/classtest/sll
Enter a value (-1 to complete): 1
Enter a value (-1 to complete): 2
Enter a value (-1 to complete): 3
Enter a value (-1 to complete): 4
Enter a value (-1 to complete): -1
1 -> 2 -> 3 -> 4 -> NULL
Enter value for new node: 5
Enter value of node you want to insert new node before: 4

Breakpoint 1, main () at sll-debug.c:55
55              while (tmp2 -> next -> value != input)//used to be tmp -> value)
(gdb) c
Continuing.
1 -> 2 -> 3 -> 5 -> 4 -> NULL
[Inferior 1 (process 11161) exited normally]
(gdb)
- quit : exits debugger
- help : get additional details about the commands
(gdb) help
List of classes of commands:

aliases -- Aliases of other commands
breakpoints -- Making program stop at certain points
data -- Examining data
files -- Specifying and examining files
internals -- Maintenance commands
obscure -- Obscure features
running -- Running the program
stack -- Examining the stack
status -- Status inquiries
support -- Support facilities
tracepoints -- Tracing of program execution without stopping the program
user-defined -- User-defined commands

Type "help" followed by a class name for a list of commands in
that class.
Type "help all" for the list of all commands.
Type "help" followed by command name for full documentation.
Type "apropos word" to search for commands related to "word".
Command name abbreviations are allowed if unambiguous.
(gdb)
10/02/2014
We continued with the debugger, learning some new commands as well as stepping through the sll-debug program to see where the segmentation fault problem is.
A few more commands for the debugger:
- whatis “variable name” - shows the data type of the specified variable
- x “variable name” - prints the variable value in hex
- set var “var name”=“new value” will set the specified variable to the new value that you type in.
- disas /m “function name” - disassembles the given function and displays it in assembly code
Step by step guide to debugging sll-debug.c: step 1: compile with debug support
gcc -g -o sll-debug sll-debug.c
step 2: launch the debugger (gdb)
gdb ./sll-debug
step 3: gdb run
this will run the program and tell what line the seg fault occured
step 4: set breakpoints and analyze
      (gdb) break 55 (this is where the seg fault occured)
      (gdb) run
step 5: check variable status
      print tmp2 -> next -> value
      print tmp -> value
      print tmp2
      print tmp
      print tmp -> next
step 6: setup auto display of variables
      display tmp2 -> next -> value
      display tmp -> value
      display tmp2 -> next
      display tmp2
      display tmp
step 7: watch it loop
[s]tep or [n]ext
as we loop through the program we see that the line
while(tmp2->next->value != tmp->value)
is the problem: we should be looking for the input that we had just typed in, and not tmp's value.
10/07/2014
Sll0 will use the following functions:
- search
- swapnode
- obtain
- remove
debugger - The need to use this will increase significantly to assist in finding errors for segfaults.
swap node
Bad!
- badswapnode.c
Node *tmp3 = mknode(tmp->value);
tmp->value=tmp2->value;
tmp2->value=tmp3->value;
free(tmp3);
good!
Obtain node
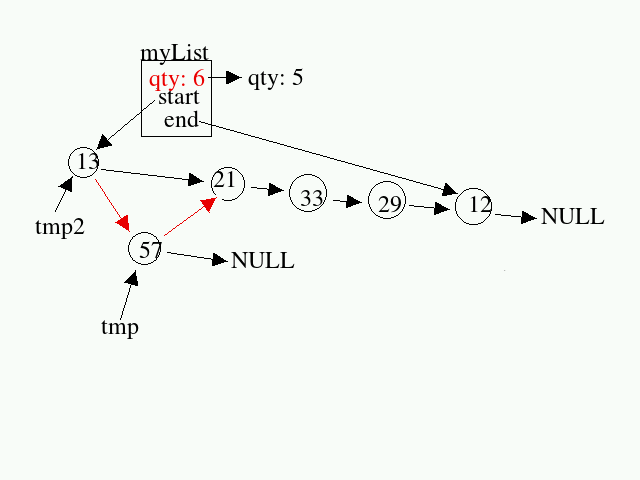
Pulls node from list, patches the hole in the list, keeps the pulled node. 3.bmp
- obtain_1.c
myList = obtain(myList, &tmp)
{
    int pos       = getpos(myList, &tmp);
    Node          *tmp2;
    tmp2          = setpos(myList, pos-1);
    tmp2->next    = tmp->next;

    *(tmp)->next  = NULL;

    myList->qty--;

    return(myList);
}
- obtain_1_optimized.c
myList = obtain(myList, &tmp)
{
    Node *tmp     = setpos(myList, getpos(myList, tmp)-1);
    tmp2->next    = tmp->next;

    *(tmp)->next  = NULL;

    myList->qty--;

    return(myList);
}
- use.c
myList = obtain(mylist, &tmp);
Implementation tips
(*tmp)->value
Misc. Notes
Obtain is the only function in our linkedlist library where we will pass by value;
Passing variables
- Pass by value
- Passes copy
- myList=insert(myList,tmp,tmp2);
- Pass by address/reference
- changes happen outside of the function
- pointers!
something to consider What if you are obtaining the first or last node? You have to change the start and end pointers.
10/09/2014
Key lessons: Memory addresses are another form of data. Pointers allow flexibility. Code becomes more abstract and more open to optimization.
Matt discussed the fact that pointers are another form of data just like integers and strings. So we can manipulate them in the same ways. We can store addresses at addresses. This leads to double pointers triple pointers and etc. We are able to infinitely expand our inter connectivity in programs by being able to reference something through multiple iterations of pointers so hi → next → next → next → value is really a powerful application of pointers.
Pointers also allow flexibility, this means that a pointer can be de-referenced to show the value at and address but instead of having to change the value you can change where the pointer points and keep your value.
code also becomes more abstract instead of working on the level of the node we work on the level of the list. then we go further and we work on lists of lists and further till we don't deal with the lower levels at all. this allows us to deal with
Nov 4,2014
Stacks
LiFo-Last in, First Out
FiLo - first in, last out.
This concept is really important when it comes to stacks because we can only acsess the stack that is on top the pillar. to acsess the rest we have to remove it.


11/11/14
dlq0
stack
- Stacks are data structures which apply rules, and organize data. They only have one pointer, which is top. An example of a stack is the card game FreeCell.

queue
- Queues are also another form of a data structure. It has two pointers(front and pack). These are used to add to the queue or enter the queue from the back.
enqueue
- used when you add nodes to the queue. When doing this it is done from the back of the queue.
dequeue
- used to remove nodes from the queue. This is done from the start of the queue.
Examples of queues

bounded queues
- there are a fixed amount of positions
- set maximum queue size
- buffer is storage that is used when the queue every request at one time. Example: music library and a printer
unbounded queues
- there is an unlimited amount of positions
FIFO
- First in- first out enqueue
LILO
- Last in - last out dequeue
Enqueue and Dequeue use list functions
Conditions
- When have a bounded queue, with a fixed size (maximum queue size) and try to add more than the maximum allows it is called a buffer overrun
- When have an empty queue and try to dequeue(take a node out of the queue) it is called a buffer under-run
Queues are like stacks
- make use of lists
- can be used to solve problems
- make use of them everyday whether intentional or unintentional
- causes order
Queues are unlike stacks
- can orient from front to back
Potential benefits of queues
- provides other solutions in many situations
Can have a stack of queues
Functions
- enqueue()add to the queue
- dequeue()remove from the queue
- purge()way to quickly remove nodes from the queue
- rmqueue()quickly remove from queue without worrying about de-allocating and nullifying the queue pointer
Object Oriented Programming C++
Is code management.
- polymorphism
- Inheritance reuse or make use of code
- Encapsulation putting something in list/containers
A function is the simplest form of inheritence.
Example of Inheritence:
EOCO Project
input the following to upgrade at lab46 prompt
grabit
cd src/data/eoce0
cd/src
cd data
cd inc
nano Node.h
virtual lines are example of polymorphism
a virtual function can be rewritten or override a function. A child can rewrite back end functionality
examples of inheritance
- node.h is the base
- singly linked node is a child
- doubly linked node is a child (or grandchild)
11/18/14
Trees
A tree is a data structure associated with the visualization of a parent-child relationship. The set up is similar to the vertical structure of a stack except the nodes branch out from a root instead of being stacked on top of each other. The root has a next and prev to a node, in which the next branches a node to the right and the prev branches a node to the left. The node struct contains the same as before except with an added other pointer. Specifically, the other pointer will be used for iterative and stack-based operations like trying to traverse back up the tree. We can traverse through the list in a stack-based, iterative, or recursive manner. We'll use an addnode function to add a given node to a tree. With the root being at height zero, each added layer of branched nodes adds to the height. The max_height places a limit on the number of nodes you can put into the tree.


11/20/14
dlt0
trees
- grabnode is deleting a node from a tree. When using we are manipulating an existing tree in a non-destructive way
- only applying this to Binary Search Tree
- when inserting we use < = node goes to left and >= node foes to the right
- binary search automatically puts the node values in order in the tree
- traversal gives returns nodes backwards where it finds the lowest value in order
- addnodeis only used one time in grabnode
Three ways of implementing grabnode
- recursively
- iterally
- stack based
other
We have been given *other to help us connect to where we came from when using addnode

removing from tree
- cant use immediate decedents
- must choose 1 of two way and stay with that approach
- - greatest to least value in the sub-tree
- - lowest value in the left sub-tree
- can only have one child when removing a node from the tree
Example in class
Original tree

grab the node with value 3 in it

t ->next -> other = t -> other;
t -> other -> prev = t -> next;
t -> next = NULL;
t -> other = NULL;
the node with the value of 4 is now isolated
- must make sure node value 4 points to same three destinations as node with value of 3
t -> prev = s -> prev;
t -> next = s-> next;
t -> other -> prev = NULL;
t- > prev -> other = t;
t -> next -> other = t;
t -> prev -> other = t;
t -> next -> other = t
return(s);
Node with the value of 4 is now in the spot where the node of value 3 was

Stack Based Approach
- get to the left most node in the sub-tree
stack *myStack = mkstack(0);
tmp = mk(node(-1));
tmp -> other = s;
push(&myStack, &tmp);

s = s -> prev;
- next and prev used for stack connection
- prev and other in tree are preserved
- use push and pop in list

