Sidebar
Table of Contents
C for Engineering End of Year Summarization
This guide serves as an overall summary of the topics learned and discussed during the semester, all information is sorted into three categorize, not necessarily by date taught
SECTION 1, USING A NAVIGATING IN THE TERMINAL
This guide only covers use in the PiOS, linux and WindowsOS. For Mac OS, consult a mental health specialist
Generally, you will have access to an operating system, which will both organize information and present it in a user friendly manner. However, there are instances, especially in this class, that will require the use of the terminal. The terminal, also known as the command prompt on windows, serves as the main connection between you and the computer. It allows you to navigate files and folders, run programs or scripts, remote into other systems or connections, and a whole variety of things. Opening the terminal is different on every OS, but is generally similar.
WINDOWS OS– Press WINDOWS+R, this will open up the run prompt, then type “CMD”. The command prompt should be open
LINUX/PIOS– Navigate to APPLICATIONS, then click and run the TERMINAL application
With the terminal view open, we now have access to an array of commands, these commands, with examples, are as follows:
NAVIGATION COMMANDS
cd - used to navigate into a directory (folder) or sub directory. cd .. can be used to exit the directory
cd src/fall2023 will go into the src directory and then into the fall2023 subdirectory within it
ls (dir on windows) - used to see the subdirectories and files or programs in the directory you are currently in.


cat - looks into a directory or file
mkdir - makes a directory
nano - creates a text file with name mentioned, or edits text file
rm - removes a directory or file
./ - runs a program
sudo - runs the following command with admin permissions
gcc - compiles a C program
ssh - allows for remote connection to a server, or another device
hg - prefix for all repository commands, which include:
- hg add - adds files in directory to repository
- hg commit - commits the added files to the repository with a message for why they are there
- hg push - pushes commited files to the repository to be added to another system
- hg pull - pulls the files pushed into the repository
- hg update - updates the systems current repository to match the one pulled
to turn in a project, you must first push it to lab46, then within lab46, run the submit command.
SECTION 2: WRITING C CODE
In this section, we will be going over the basics of writing, troubleshooting, and compiling C code, aswell as basic functions and basic programs that are either useful, or a good refresher.
BASIC OVERVIEW
C code has a structure that should typically be followed, if you want a program to be compiled. Since the computer reads code in the same order we do, generally code is structured like this:
libraries
variables and definitions
int main
return
function definitons
LIBRARIES
Libraries function as a way for the computer to get definition of functions not already embedded in the kernel / language. While not necessary, as you can create custom functions within your own code, they are useful and prevent you from having to create your own functions and operations. To include a library, you write #include.
MAKE SURE YOU HAVE THE LIBRARY INSTALLED
THE BASIC HELLO WORLD PROGRAM
To begin, a text file will be needed. We can either create it in the terminal using the NANO command, or we can use a text editor to write the code instead. In this section, however, we will assume you are using the terminal. The file extension should be .c to decern that it is indeed C code.
nano program.c
We now should be within the GNU text editor. We can now write our code. For this example, we are going to be writing a basic hello world script. However, there will be a list of other basic functions, aswell as a list of definitions, and more wiring pi orientated code in section 4.
The first lines with our code should be our libraries. Libraries allow the computer to look into another file for definitions of certain functions not built into the kernel or into the language. For example, to control a servo, you would use the servo.h library, or you could create all the functions and calculations yourself.
to include a library, use the #INCLUDE line. Within GNU, the text will turn a different color, then write the name of the library used. In this example, we need the stdio.h library, thus we need to write,
#include stdio.h
This is the only library we are going to need for this program, so we move on to declaring variables.
in this example, no variables are needed, so we can skip writing and defining our variables.
Now, we need to start our main line, to do this, we simply use
int main(void){
within this block will be all of our code, now we write our print function, for this we use
printf("hello world!\n");
\n ends a line, and printf allows for text or data to be printed to the terminal
finally we can end the code with our return and closing bracket
 return(0);
}
now we can close the gnu program by doing ctrl+x and then saving changes and naming the file. Before we can run the program, it needs to be compiled.
To compile, we use the gcc command in the terminal
gcc program.c -o program
if we used extra libraries, such as wiringPi in the future, we will add -lwiringPi or -l(library name) before the -o.
if there are any errors in your code, the compiler will fail and give you the errors it found, if not, then
You can run the program using ./program
CONGRATULATIONS, YOU HAVE WROTE YOUR FIRST BASIC C PROGRAM
IF, ELSE, FOR, WHILE, AND LOGIC
Within C, and most languages, there are different loops and statements you can use to have a function happen conditionally, or repeat.
If statements are conditional statements that only run if the condition is met
 if(condition){
code }
else statements can be added to run something if the condition isnt met, ifelse also works if you have multiple conditions
 if(condition){
code
ifelse(condition){
code
else {code}
While loops work the same, except they run until the condition isnt meant
 while(condition){
code}
for loops act the same as while, but allows for a change of a value after each iteration of the loop
 for(x=1, condition, x++){
code}
Logic operators are also useful for doing bit manipulation
| LOGIC | ||
|---|---|---|
| and | returns 0 if atleast one bit has a 0 | |
| or | returns 1 if atleast one bit has one | |
| not | returns the opposite | |
| xor | returns 0 if both bits are opposite | |
we can also create our own functions aswell if needed. to do that, we just need to do
  int NAME(int VARIABLE1, int VARIABLE2, ... , int VARIABLEN){
int RESULT = 0;
RESULT = whatever you want code to do;
return(result);
a library essentially is full of this, which allows us to use functions not in the c language natively.
the last important note is different data types, which are important to know as each have a max size, they are as follows
Signed char- occupies 1 byte of memory or 8 bits, or numbers from -128 to 127.
Unsigned char- same as signed char, but no negatives, 0 to 255
Signed short int- occupies 2 bytes of memory, or numbers from -32,768 to 32,767.
Unsigned short int-same as signed short int, with no negatives, 0 to 65,535.
Signed int- occupies 4 bytes of memory, or numbers from -2,147,483,648 to 2,147,483,647
Unsigned int- same as signed, but no negatives, 0 to 4,294,967,295.
Signed long int- occupies 8 bytes of memory, from -9,223,372,036,854,775,808 to 9,223,372,036,854,775,807.
Unsigned long int- same as signed long int, but no negatives, from 0 to 18,446,744,073,709,551,616 .
Signed long long int- occupies 8 bytes of memory, max/min is +-18,446,744,073,709,551,615
Unsigned long long int- occupies 8 bytes of memory, max is 18,446,744,073,709,551,615
SECTION 3: HARDWARE AND WIRINGPI
Hardware is the most used part of this class, where we typically use LEDS and Wiring pi.
with wiring pi installed by doing
wget https://project-downloads.drogon.net/wiringpi-latest.deb
then
sudo dpkg -i wiringpi-latest.deb
with wiring pi now installed, we can do some basic things
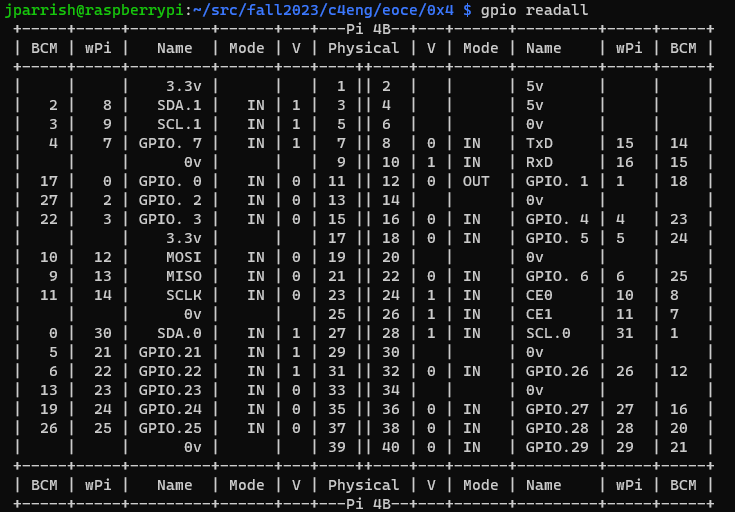
typing gpio readall into the terminal will spit back the state of all the pins on the gpio board
 typing gpio write (wpi number) 1 will change the state of the selected pin to 1 or HIGH, type 0 for LOW
gpio mode (wpi number) out will change the pin to output mode, typing in instead will put it into input mode
for any project, youll need the wiringPi library included in your code to make use of wiringPi
Within your code, you can use digitalWrite and digitalRead to change the state or read the state of a pin, which is useful for turning an led on and off or checking to see if a button is pressed
 digitalWrite (pin,HIGH or LOW)
digitalRead(pin)
if we include softPwm into our libraries, we can also change how much voltage is sent through the pin, instead of High or Low
 softPwmCreate(pin,min,max)
softpwmWrite(pin, level)
this is useful to make an led breathe or to get different colors in an RGB led
for components, there are far to many to list and explain how they must be wired, instead, one can refer to the wiringPi spreadsheet, which gives basic examples, and wiring for each component
Zip file with pdf, and more
SECTION 5: SPREADSHEETS AND TEXT BASED TASKS
This section will show how to install the spreadsheet program and basic functions
firstly, install sc by runnning
sudo aptitude install sc
once sc is installed, you can open files by doing sc (filename)
within sc, there are tons of functions and commands that can be looked upin the terminal with
man sc
But, for the purposes we are using it for, there are only a handful that you should really know
| Q | quit the program |
| = | enter a number that you can use for cell calculation (D4 - D5) |
| /<,> | enter a string center aligned ,left, or right aligned |
| @sum | add all in specified range |
within the course, sc is mainly used for gfo.
