ENGR1050 C for Engineers
PROJECT: Create A Theremin (CAT1)
OBJECTIVE
Make music (or at least noise) by waving your hand around! We bring together the ultrasonic distance sensor and passive buzzer we explored in cat0, and have our program turn distance into pitch.
PROCESS
Do note, the productive way to go about this project involves taking the following steps:
- starting early
- reading the project page
- asking questions regarding things you do not know, are not clear on, or are confused about
- as information, concepts, processes become clear, that is something you can contribute to the project documentation (so you can better remember)
If you start too late, and do not ask questions, and do not have enough time and don't know what is going on, you are not doing the project correctly.
OBTAIN THE PROJECT FILES
To assist with consistency across all implementations, data files for use
with this project are available on lab46 as a grabit. Please copy the
data to your private semester repository under an appropriate project
directory to begin work, and ensure your implementation properly works
with the provided data.
The project should be obtained by the Sunday prior to the due date.
lab46:~/SEMESTER/c4eng$ grabit c4eng cat1Please study any provided code and supporting documents, and look up, experiment, and ask questions on aspects that you do not understand.
OPERATING THE PROJECT
These projects will have two paths to them, depending on which device you are using:
- Raspberry Pi single board computer (4/5) using the
wiringPilibrary - Raspberry Pi Pico microcontroller
lab46:~/SEMESTER/c4eng/cat1$ make
Please select which development environment:

  make wiringpi - using the Raspberry Pi with wiringpi library
  make pico     - using the Raspberry Pi pico

after which, you can use 'make' to build
lab46:~/SEMESTER/c4eng/cat1$
Run the make command with the category representing the path you will
be working with for this project.
After which, if you do an ls, you will see a cyan-colored file called
cat1.c. This is the C file you will be editing for this project.
Go ahead and view it, study the code, eventually make any changes, save and return to the command-line.
To build it, you simply run: make
If there are no errors, it will build, and you proceed from there.
MAINTAINING YOUR REPOSITORY
Be sure to keep your repository up-to-date, regularly committing changes to files.
As a reminder, here are the suggested steps:
-1. make clean <– remove all unnecessary files
-
git status<– see the current state of things -
git pull<– pull down any changes from elsewhere -
git add<– add each new or modified file 2a.git add ./<– try this the first time -
git commit -m "your message"<– make a snapshot git push
UNDERSTANDING THE TECHNOLOGY
A theremin is an unusual musical instrument: you play it without touching it. The performer moves their hands near (but not touching) a pair of antennas, and the distance of the hand from an antenna controls the pitch (one hand) and volume (the other). We're going to build a simplified cousin of this with the parts in our kit: one "antenna" (the ultrasonic sensor), controlling pitch.
You already know how the pieces work from cat0:
- the sensor gives us a time, which we convert to a distance
- the passive buzzer makes whatever frequency we tell it to
What is new is the connection between them. We need a mapping: a rule that takes a distance and produces a frequency. Mappings are everywhere in engineering (a thermostat maps a temperature to a heater setting; a throttle pedal maps a position to an engine speed). Designing one involves choices, and no single choice is "right":
- which direction? Does bringing your hand closer raise the pitch, or lower it?
- over what range? Sensor readings span 2 to 200cm, but your arm doesn't. Pick the nearest and farthest distances that matter
- to what frequencies? The buzzer will be easiest to hear near its 2000Hz resonance, but a theremin is no fun with only a narrow range
- with what shape? Does moving your hand 10cm change the pitch by the same amount no matter where you are in the range?
On that last point: our ears do not perceive pitch linearly. Going from 200Hz to 400Hz sounds like the same musical interval (an octave) as going from 1000Hz to 2000Hz, even though the first difference is 200Hz and the second is 1000Hz. A mapping in which equal movements of your hand produce equal ratios of frequency will therefore sound more natural than one producing equal differences. Try both!
TASK
Taking our knowledge of GPIOs, the ultrasonic sensor, and the passive buzzer:
- assemble the circuit from cat0 (if it is still standing, you are done with this step)
- rework the provided code so that the pitch of the buzzer follows the distance of your hand from the sensor, as described below
- play it! Post a video of you performing to the class DISCORD
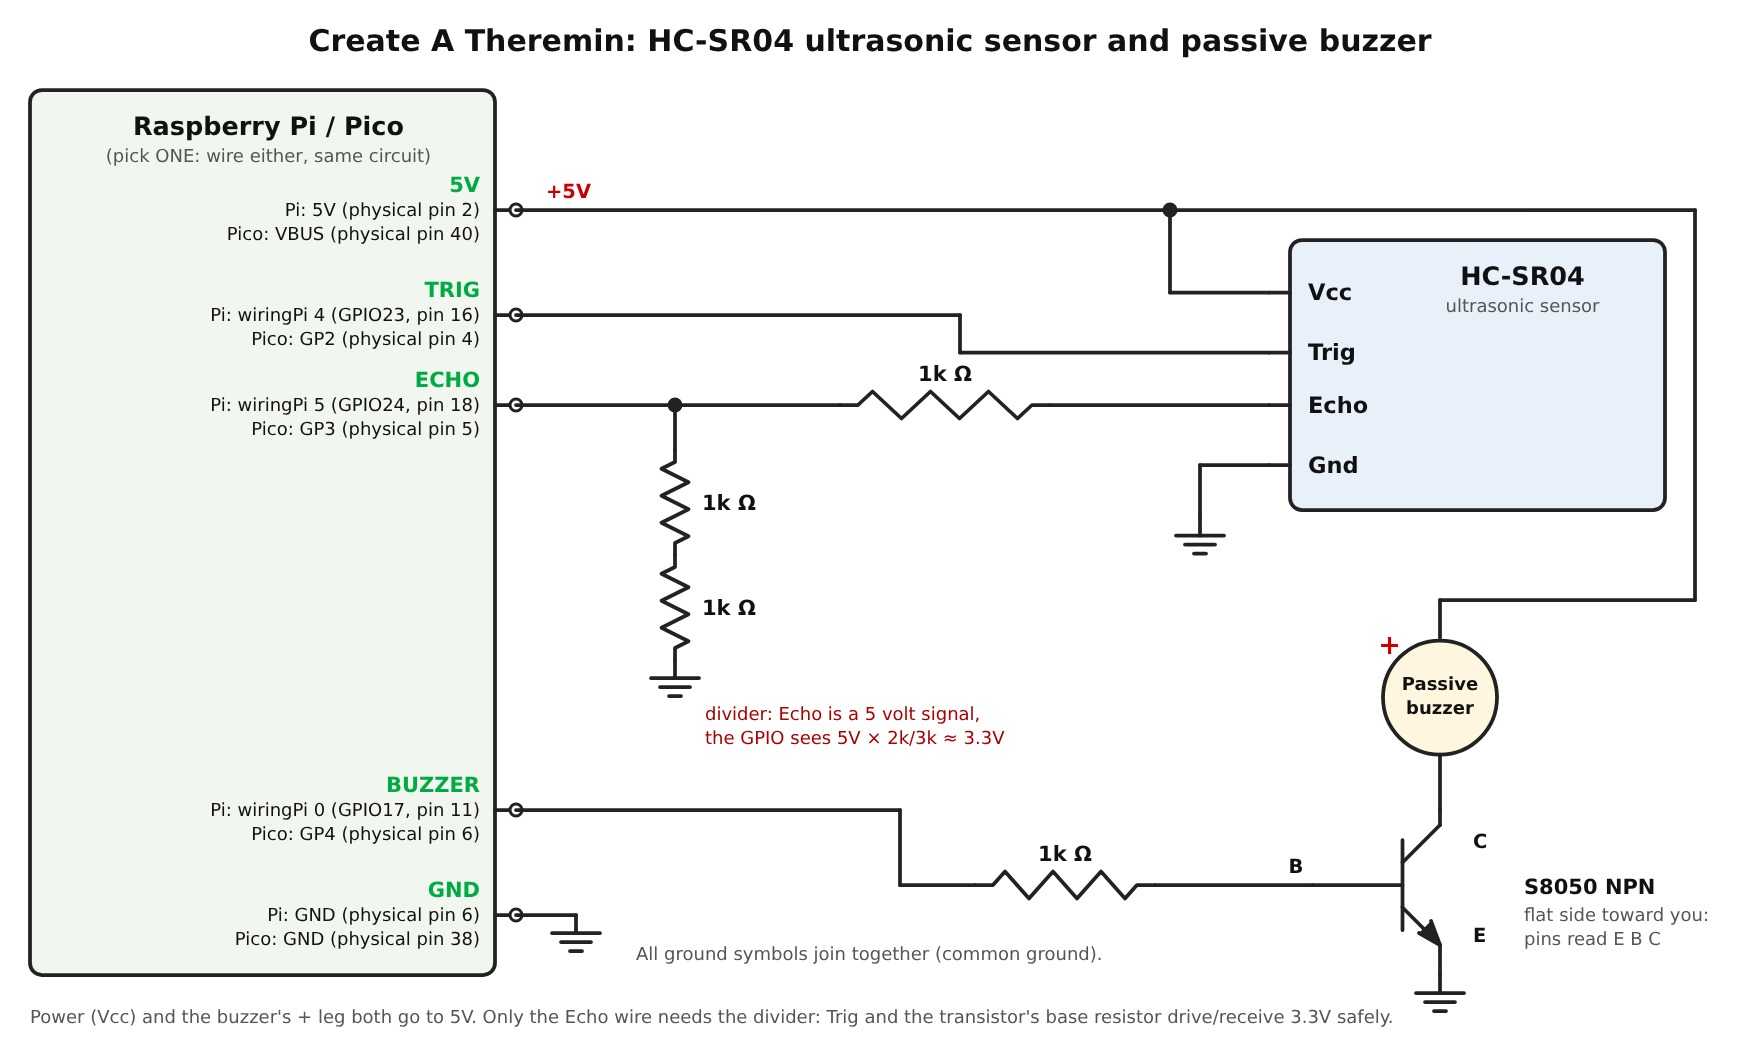
The circuit
It's the same as in cat0. For quick reference (pin choices are defined at
the top of your cat1.c file; if you wire to different pins, change the
values there):
| Connection | Raspberry Pi | Pico |
|---|---|---|
| Sensor VCC | 5V (physical pin 2) | VBUS (physical pin 40) |
| Sensor GND | GND (physical pin 6) | GND (physical pin 38) |
| Sensor Trig | wiringPi 4 (GPIO23, pin 16) | GP2 (physical pin 4) |
| Sensor Echo (via divider) | wiringPi 5 (GPIO24, pin 18) | GP3 (physical pin 5) |
| Buzzer (via 1k and S8050) | wiringPi 0 (GPIO17, pin 11) | GP4 (physical pin 6) |
The sensor's Echo MUST go through the voltage divider (1k ohm to the GPIO, then two 1k ohm resistors in series to ground), as the Echo output is 5 volts and our GPIOs are not 5 volt tolerant. The buzzer's positive leg connects to 5V, its negative leg to the transistor's collector, the transistor's emitter to ground, and the GPIO connects to the transistor's base through a 1k ohm resistor. See cat0 for the details.
The theremin
The code you are given has ONE threshold: if something is closer than
THRESHOLD, a single steady tone sounds (and on the pico, the onboard
LED lights), otherwise it is silent. It's a doorbell, not an instrument.
Your task is to make the pitch a continuous function of distance:
- if no echo was received, or the object is farther than the farthest distance you chose: silence
- otherwise, calculate a frequency from the distance and sound it, such that the pitch follows your hand smoothly as it moves
- at or closer than the nearest distance you chose, the pitch stays at its extreme (it does not keep climbing or falling, nor wrap around or go negative)
- the frequency you produce must always remain within the lowest and highest frequencies you chose
- on the pico, the onboard LED lights while the instrument is sounding. On the Raspberry Pi, display the distance and frequency being played
- on the Raspberry Pi, the distance must still be reported (the pico, having no screen, is judged by its pitch and its LED)
Some guidance:
-
a function that is given a distance and returns a frequency,
distance_to_frequency(), is provided in your source file, along with starting values for the range (NEARDIST,FARDIST,LOWFREQ,HIGHFREQ). It works, but is not yet the instrument you want: as given, farther is higher, and the sweep is linear. Read its comments, make the changes they ask for, and hook it up inmain()(it is not called as given). Test it by itself (does the nearest distance give your lowest or highest frequency, as intended? What about halfway between?) -
a convenient way to think about the mapping is to first find how far along your range of distances the hand is, as a fraction from 0 (at the nearest distance) to 1 (at the farthest):
fraction = (distance - nearest) / (farthest - nearest)then use that fraction to find your way between your frequencies. Be mindful of integer versus floating point division!
- to move linearly between two values, you scale the difference by the
fraction, and add it to where you started. To move by equal
ratios, you instead scale the ratio of the endpoints… which
involves raising it to the power of the fraction (see
pow()inmath.h) - carry over what you did in cat0: copy your finished
sample_distance()(and the constants it needs) intocat1.c, and use it to keep the pitch from jittering. But consider the trade-off you were asked about there: if your instrument takes a third of a second to notice your hand has moved, it will feel sluggish. How many samples (and how long a pause between them) make for a pleasant instrument? Choose your values deliberately, and explain your choice in a comment - you will find that your instrument is much more pleasant to play if
you pick your constants (nearest and farthest distance, lowest and
highest frequency, number of samples, delays) with some thought, and
give each a descriptive
#definename. Plan to try several settings - on the Raspberry Pi, the buzzer's tones are generated by a background thread that shares the processor with the rest of your program. If you notice odd behavior in your readings while the buzzer is sounding, that may be why. Make note of it in your comments if you do
- the sensor is most reliable when aimed squarely at a flat surface. Your hand will do, but your sleeve may not!
For those wishing to go further (not required, and no extra credit, but cool): instead of letting the pitch slide freely, snap it to the nearest note of a musical scale (use the array of frequencies from cat0), and your hand will be able to play recognizable tunes. How wide a band of distance should each note get?
EXECUTION
If on the pico, follow the process for downloading the binary file and programming your pico. The pico has no screen: the onboard LED lights while your instrument is sounding, and what you hear is your feedback.
If on the full Raspberry Pi, you have a green executable you can run just as we've done in our other projects.
STRATEGY
The general flow of the process (one way of going about it, anyway) can be described as follows:
INITIALIZE THE GPIOS AND THE BUZZER
REPEAT INFINITELY:
    OBTAIN THE MEDIAN DISTANCE

    SHOULD THERE BE NO READING, OR THE OBJECT BE BEYOND THE FARTHEST:
        SILENCE THE BUZZER
        TURN OFF THE LED (IF ON THE PICO)
        REPORT THAT NOTHING IS THERE (ON THE PI)
    OTHERWISE:
        DETERMINE THE FREQUENCY FOR THE DISTANCE
        SOUND THE BUZZER AT THAT FREQUENCY
        TURN ON THE LED (IF ON THE PICO)
        REPORT THE DISTANCE AND FREQUENCY (ON THE PI)

    DELAY BRIEFLY

REPEAT BLOCK
And for your frequency function, a linear approach:
GIVEN A DISTANCE:
    SHOULD THE DISTANCE BE AT OR BELOW THE NEAREST:
        TREAT IT AS THE NEAREST
    SHOULD THE DISTANCE BE ABOVE THE FARTHEST:
        TREAT IT AS THE FARTHEST
    FIND HOW FAR ALONG THE RANGE THE DISTANCE IS, AS A FRACTION OF 0 TO 1
    MOVE THAT FRACTION OF THE WAY FROM ONE END OF THE FREQUENCY RANGE TO
        THE OTHER
    RETURN THE RESULTING FREQUENCY
SUBMISSION
To be successful in this project, the following criteria (or their equivalent) must be met:
- Project must be submit on time, by the deadline.
- Late submissions will lose 33% credit per day, with the submission window closing on the 3rd day following the deadline.
- All code must compile cleanly (no warnings or errors)
- Compile with the
-Walland--std=gnu18compiler flags - All requested functionality must conform to stated requirements (either in this document or in a comment banner in the source code files themselves).
- Compile with the
- Executed programs must display in a manner similar to provided output
- Output formatted, where applicable, must match that of project requirements
- Processing must be correct based on input given and output requested
- Output, if applicable, must be correct based on values input
- Code must be nicely and consistently indented
- Code must be consistently written, to strive for readability from having a consistent style throughout
- Code must be commented
- Any "to be implemented" comments MUST be removed
- These "to be implemented" comments, if still present at evaluation time, will result in points being deducted.
- Sufficient comments explaining the point of provided logic MUST be present
- Any "to be implemented" comments MUST be removed
- No global variables (without instructor approval), no goto statements, no calling of main()!
- Track/version the source code in your lab46 semester repository
- Submit a copy of your source code to me using the
submittool (make submiton lab46 will do this) by the deadline.
Submit Tool Usage
Let's say you have completed work on the project, and are ready to submit, you would do the following:
lab46:~/SEMESTER/c4eng/cat1$ make submitYou should get some sort of confirmation indicating successful submission if all went according to plan. If not, check for typos and or locational mismatches.
What I'll be looking for:
RUBRIC
I'll be evaluating the project based on the following criteria:
312:cat1:final tally of results (312/312)
*:cat1:used grabit to obtain project by the Sunday prior to duedate [13/13]
*:cat1:post a short video of your theremin to the class DISCORD [13/13]
*:cat1:sensor and buzzer hooked to unique GPIOs [26/26]
*:cat1:distance correctly measured and reported [26/26]
*:cat1:no echo, out of range silences the buzzer (no hang) [26/26]
*:cat1:distance-to-frequency function completed and tuned [52/52]
*:cat1:pitch changes continuously as the distance changes [78/78]
*:cat1:frequency kept within chosen bounds [26/26]
*:cat1:readings smoothed with median of samples (from cat0) [26/26]
*:cat1:LED (pico), frequency display (Pi) indicates instrument sounding [13/13]
*:cat1:code tracked in lab46 semester repo [13/13]
Additionally
- Solutions not abiding by spirit of project will be subject to a 50% overall deduction
- Solutions not utilizing descriptive why and how comments will be subject to a 25% overall deduction
- Solutions not utilizing indentation to promote scope and clarity or otherwise maintaining consistency in code style and presentation will be subject to a 25% overall deduction
- Solutions not organized and easy to read (assume a terminal at least 90 characters wide, 40 characters tall) are subject to a 25% overall deduction